Polter Click watches for a trigger, checks what is on your screen, then presses keys and
moves the mouse for you. This page walks the whole app screen by screen, then boils it down
to the things you actually sit down to do.
01 How Polter Click thinks
Four words, nested: a macro holds stages, a stage holds flows, a flow
holds nodes. Inside out:
Node
One step: press a key, wait for something, move the mouse, branch, loop. Nodes are the
chips in every diagram below.
Flow
A lane of nodes, run top to bottom. After the last one it starts again from the first,
on its own, until the macro stops.
A second flow gets its own lane and its own clock. Neither waits for the other — the
top lane presses a key every second while the bottom one sits on a four-second cooldown.
That is the whole of parallelism here, and why you rarely need a second macro.
Stage
A phase — “fishing”, then “selling”. It holds the flows that run during it, plus the
exit condition that ends it. When that condition passes every flow stops at once
and the next stage starts with a different set. A stage can point back at an earlier one,
so a macro can cycle instead of running out of steps.
Macro
What you start and stop. It owns the stages and the trigger key — a global
hotkey, so it reaches you once a game has focus. Press it again and every stage and every
lane stops at once.
One more pair, for when a macro has to look at something. A search
is always what to look for — a saved object or
colour — and where: the whole screen, or a saved
area. Never one half without the other.
02 Your first macro
The shortest useful macro is “when I press this key, press that key on a loop”. It takes
about a minute and introduces every control you will use later.
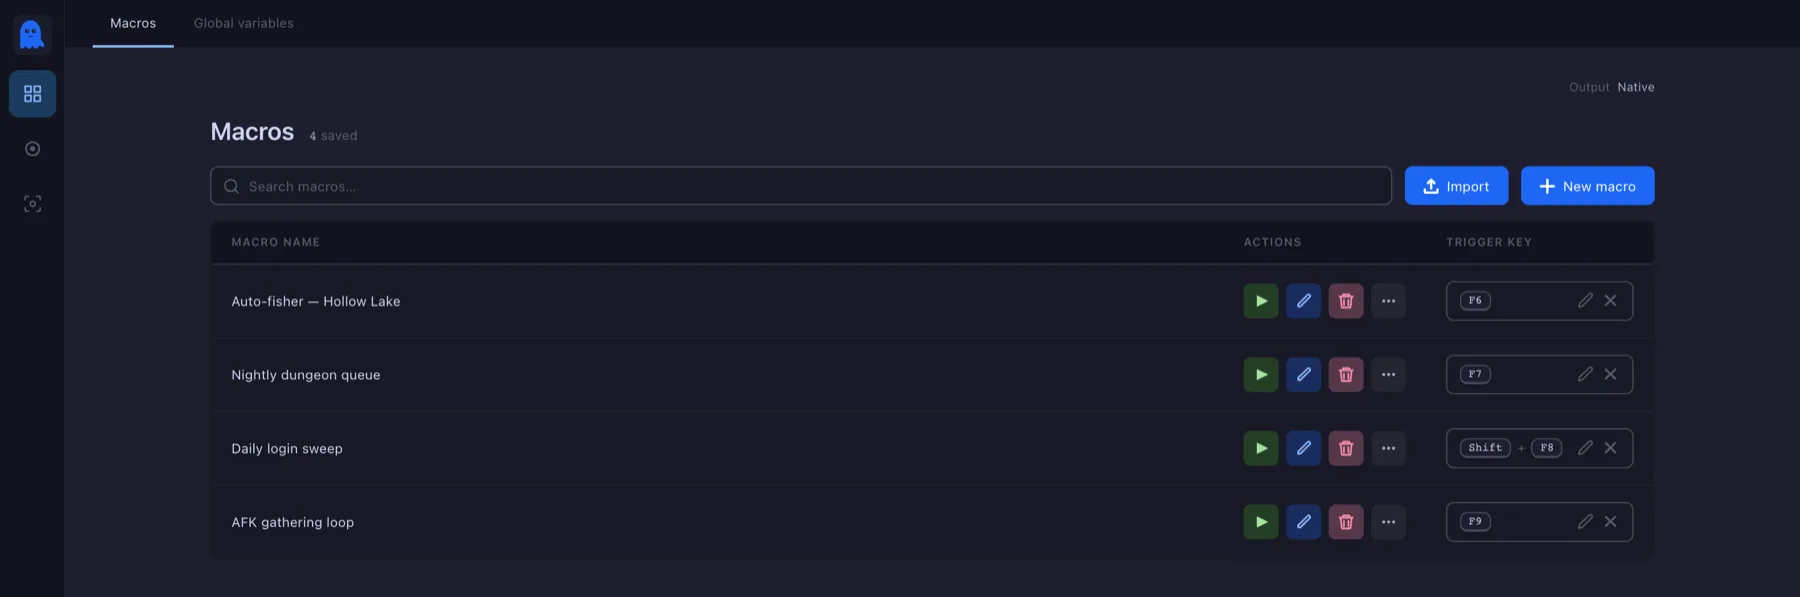
The list you land on. Every macro you save shows up here with its trigger key, a start button, and an editor. Nothing runs until you start it.
New macro, then give it a trigger key
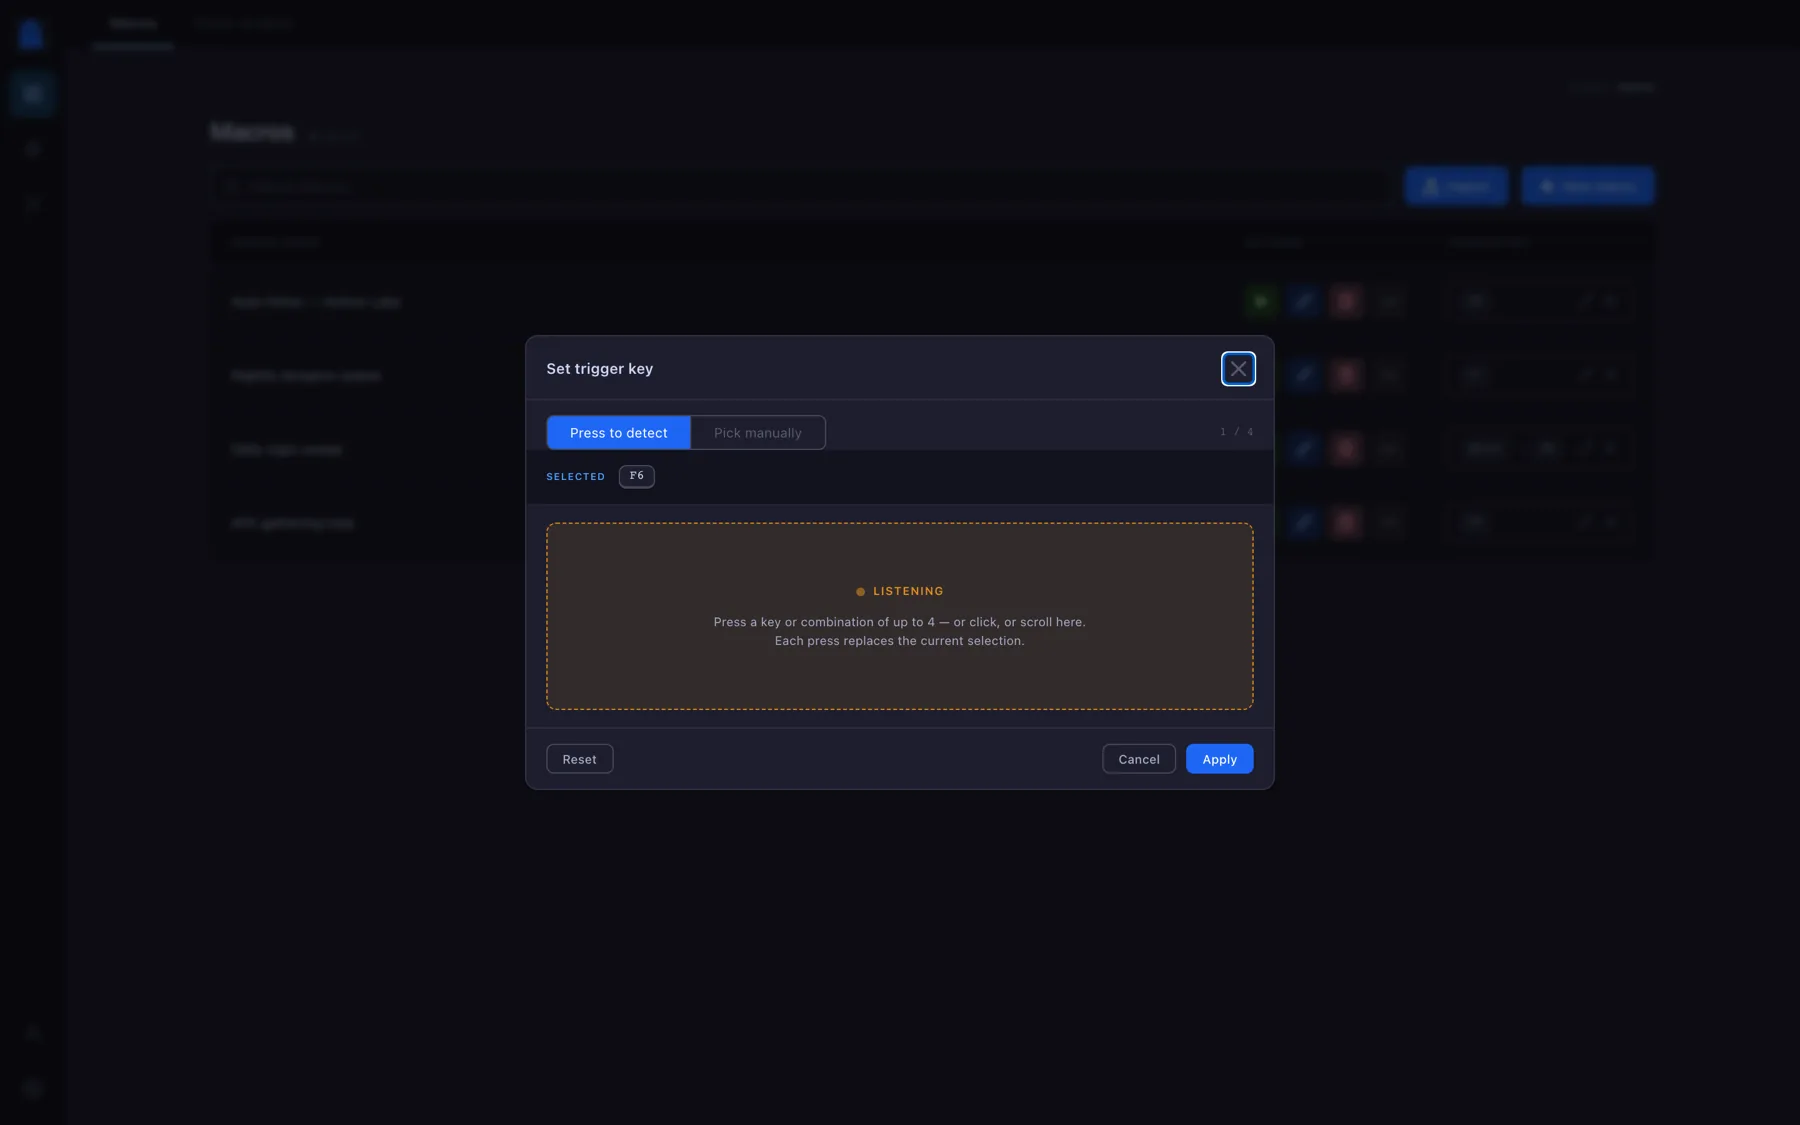
New macro creates the row and drops you into the editor. Back on the list, the
trigger-key field opens a picker that can capture what you press — keyboard keys, mouse
buttons, even the scroll wheel — or let you pick from a list. A combo may hold several
buttons, and the order you press them in is the order it expects.
The trigger picker. The same control sets the recorder's hotkey and the screenshot hotkey elsewhere in the app.
Add your first node
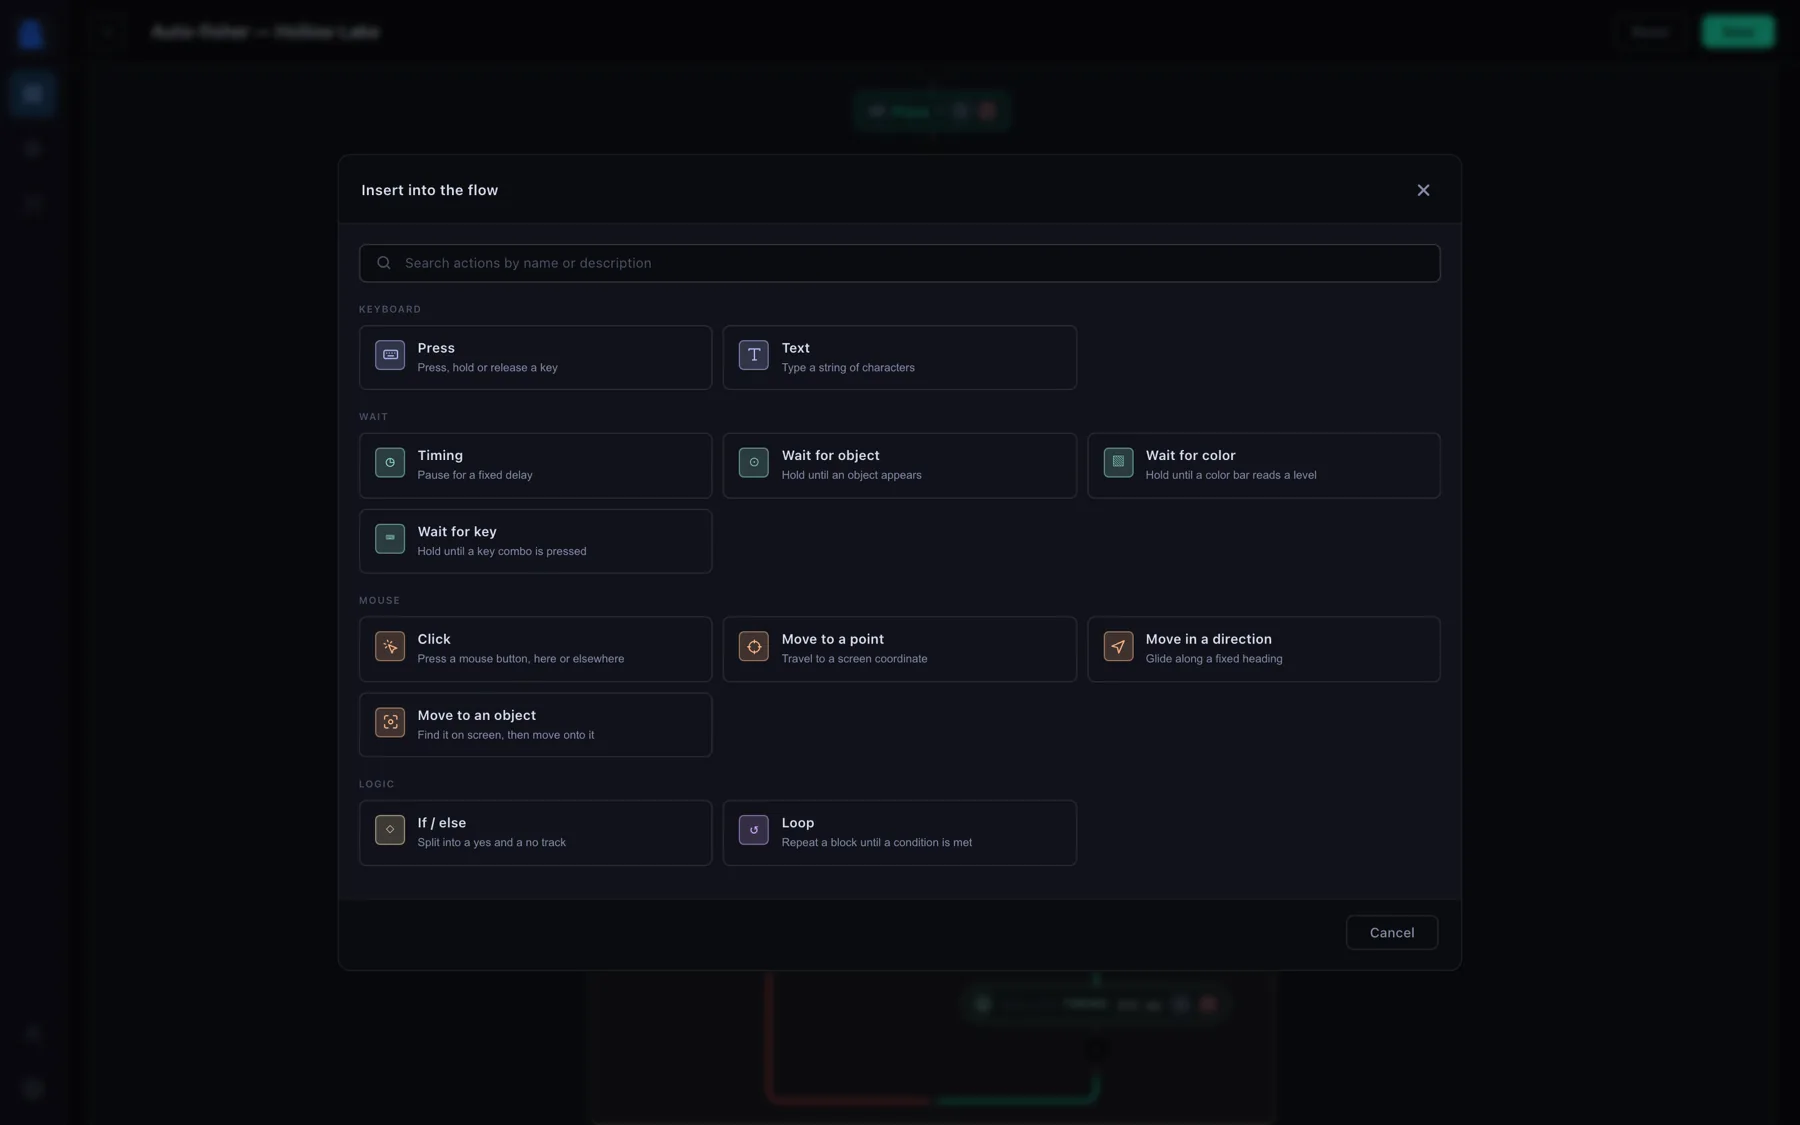
Every + on the rail opens the palette. What you pick is the node type
— there is no second “now choose a kind” step — and the node's own editor opens straight
away.
Everything a flow can do. Keyboard and Mouse are the actions; Wait blocks until something is true; Logic branches and repeats. Break loop only appears when the + you clicked is inside a loop.
Say what it presses
Press covers all three keyboard operations: click
(press and release), hold (press and leave down) and release (lift what a
hold pressed). A fresh one carries no button at all, so it opens straight onto the
picker.
Save, then start it
Save writes the whole stage tree at once. Back on the list, the green play button
arms the macro — or press its trigger key. A running macro shows a badge, and the same
key stops it again.
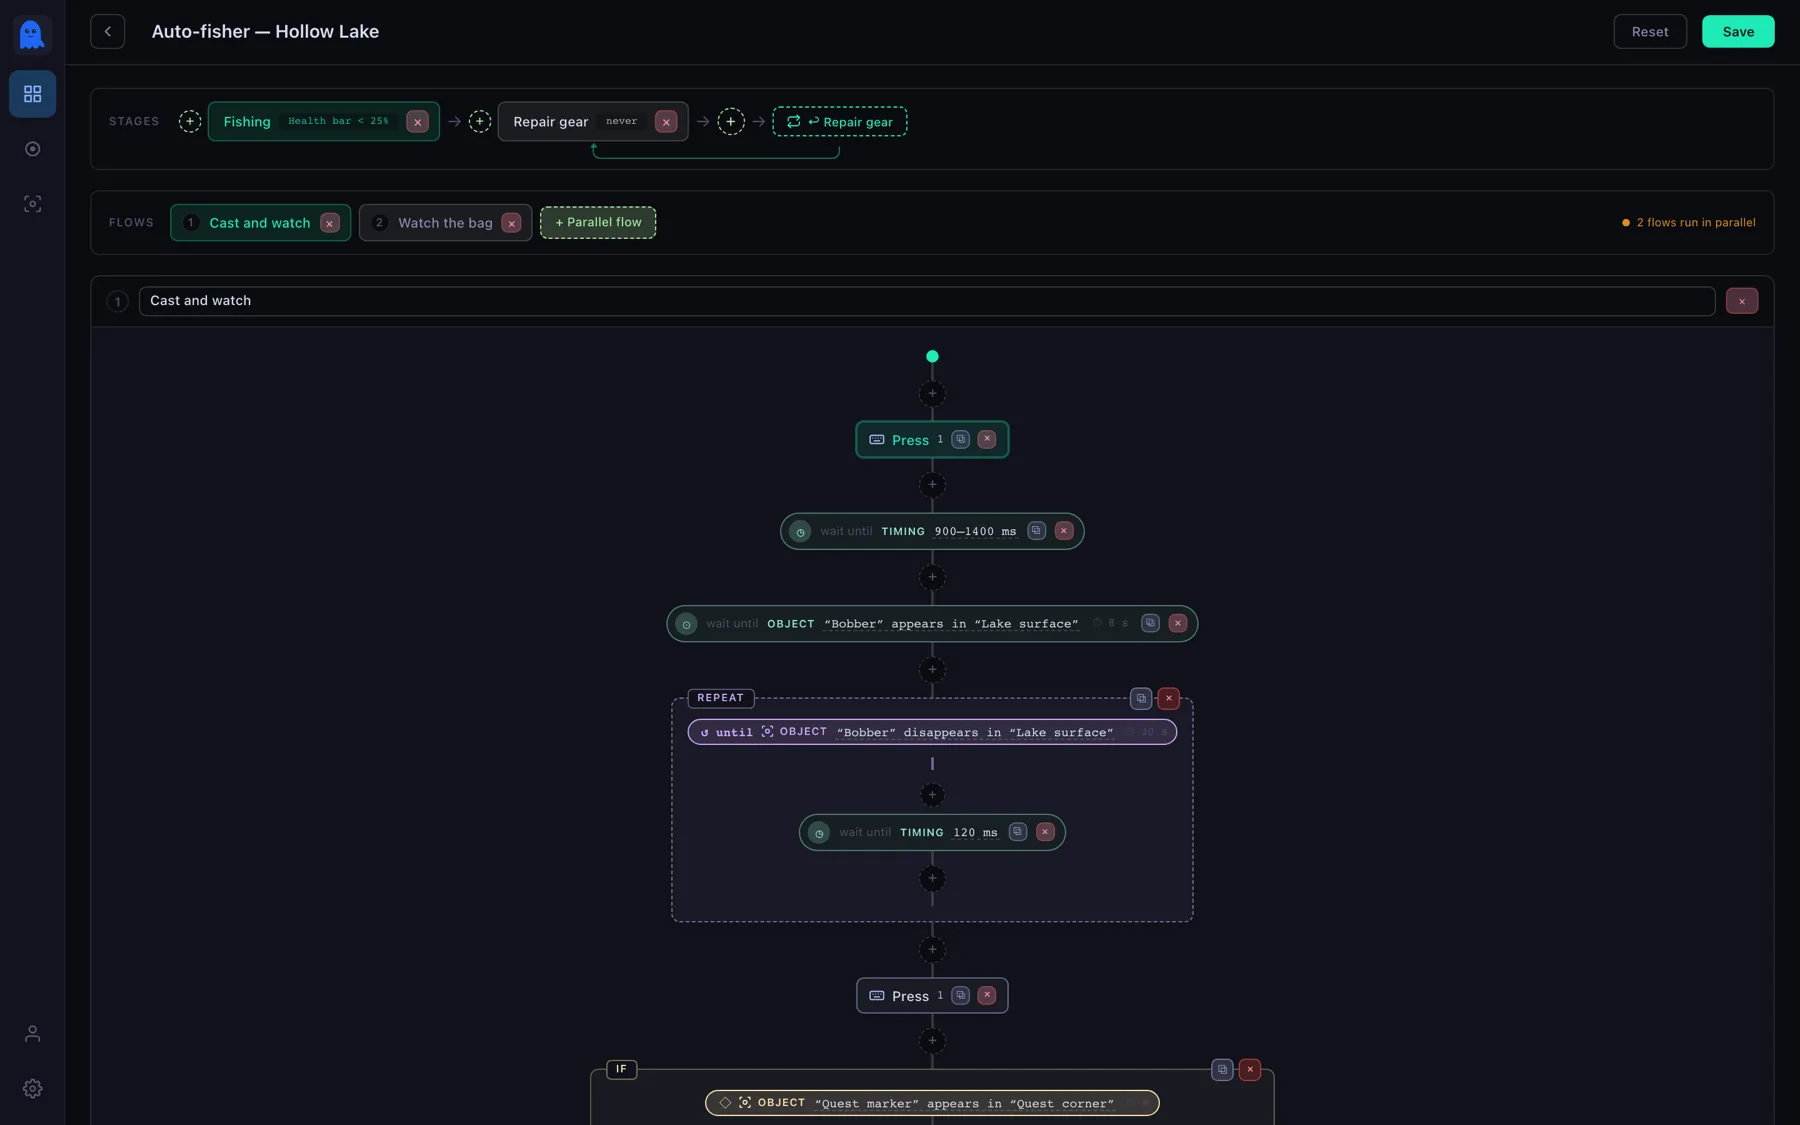
The editor. Stages across the top, the stage's parallel flows under them, and the selected flow's node chain running down the middle. Every node has a duplicate and a delete button; drag a node to reorder it inside its own track.
Worth knowing
Nothing is written to disk until you hit Save, and the editor warns you before you
leave with unsaved changes. If a save is refused, the message names the exact spot —
Stage "Fishing" → flow "Cast and watch" → step 3 — rather than making you hunt.
03 Making it wait
A macro that only presses keys on a timer is a toy. What makes it useful is waiting for the
screen. There are four wait nodes, and they are all the same node underneath — only the
condition differs.
WaitTimingPause for a fixed delay, or a random one inside a range so the rhythm is not identical every time.
WaitWait for objectHold until a saved picture appears on screen — or until it disappears.
WaitWait for colourHold until a saved colour bar reads above or below a level.
WaitWait for keyHold until you are holding a key combo down.
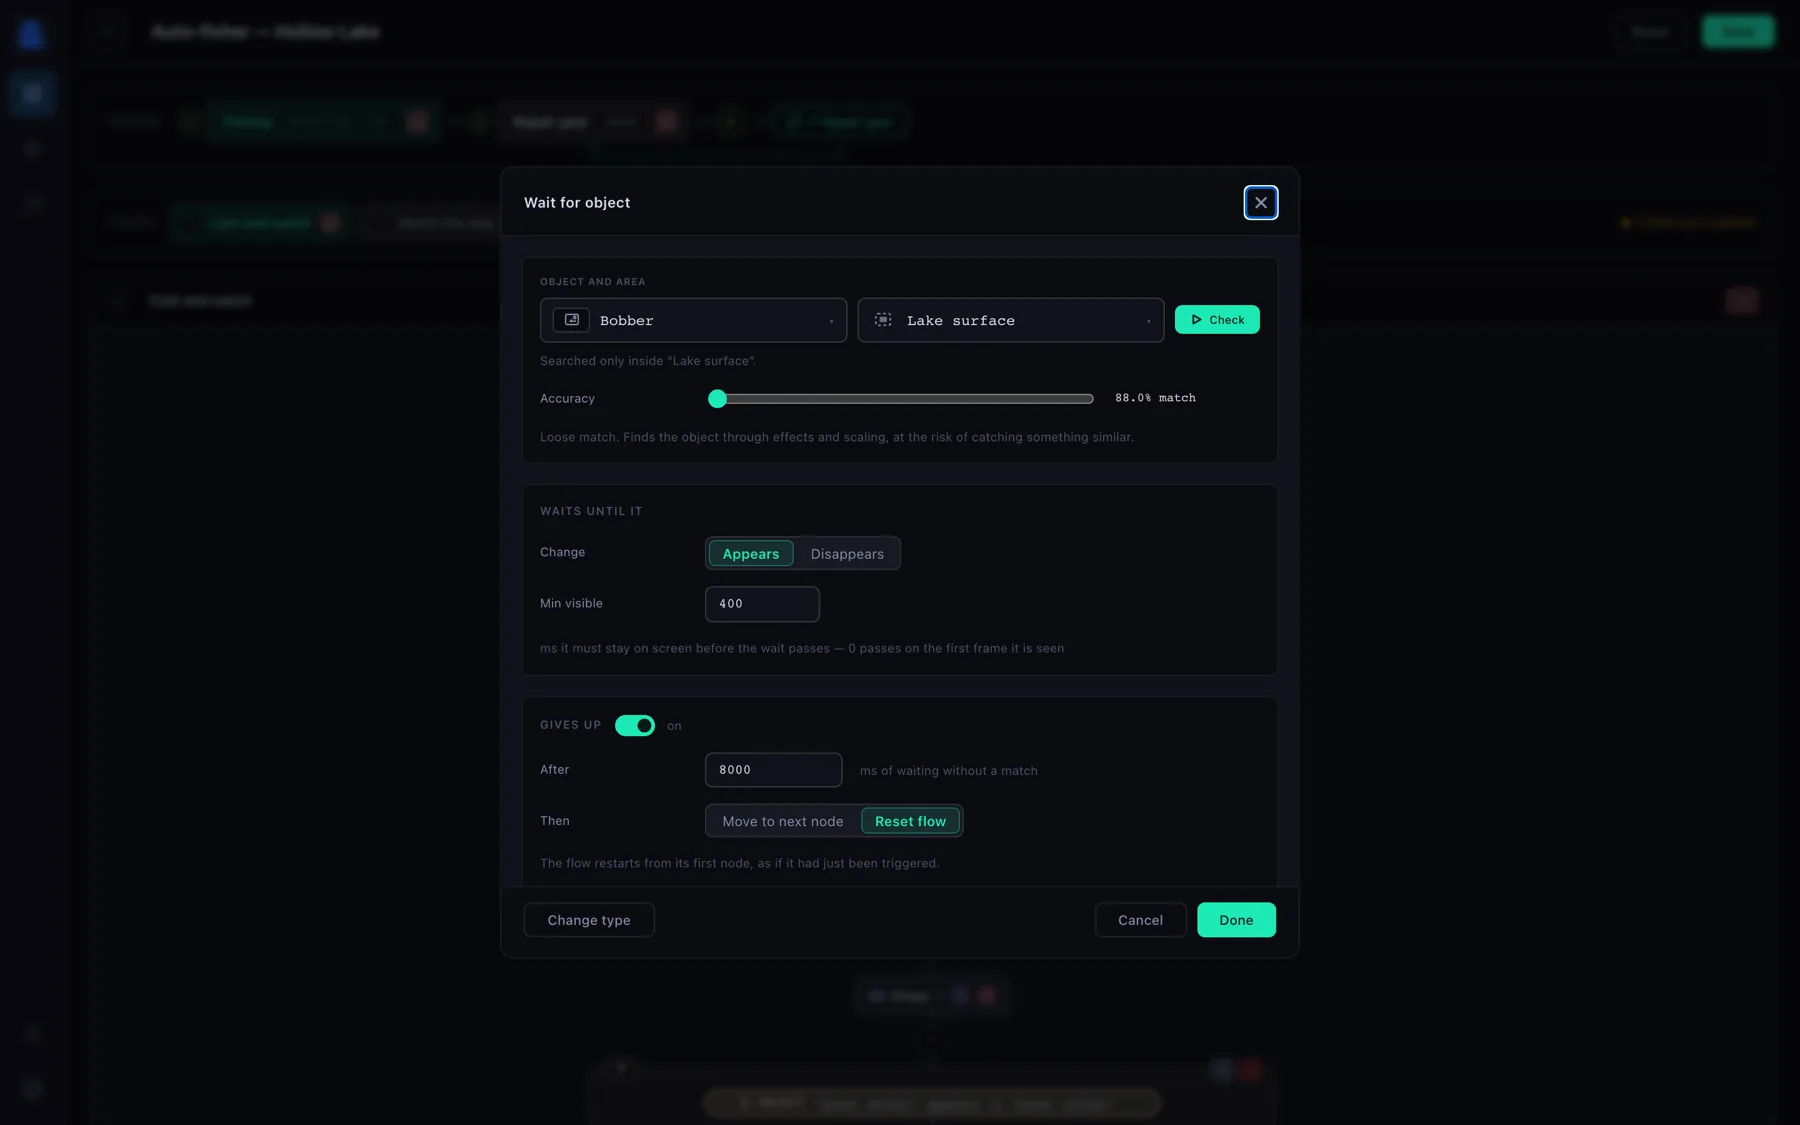
One wait, fully configured. Which object, which area, how close a match counts, whether it waits for the thing to appear or to vanish, how long it has to stay there — and what happens if it never shows.
Accuracy
The slider is how sure the match has to be. High is strict: the object must look almost
exactly like the picture you saved. Low is forgiving — it will find the thing through
lighting changes and scaling, at the risk of catching something that merely resembles it.
Start high and come down only if a match is being missed.
Min visible
An icon that blinks can be seen for a single frame and vanish. Min visible says how
long it has to stay on screen before the wait counts it — 0 passes on the first
frame it is seen. There is a matching setting for “continuously gone”.
Giving up
Every wait starts out patient: with the toggle off it waits for as long as it takes, forever
if it has to. Turn Gives up on and you get a deadline in milliseconds plus a choice of
what happens when it runs out — move to the next node and carry on, or reset the
flow and start the lane again from its first step, as if it had just been triggered.
Nothing is pre-set
No node arrives with a deadline already on it. A give-up that nobody asked for quietly
abandons a wait that was going fine — so you turn it on deliberately, where you mean it.
Combining conditions
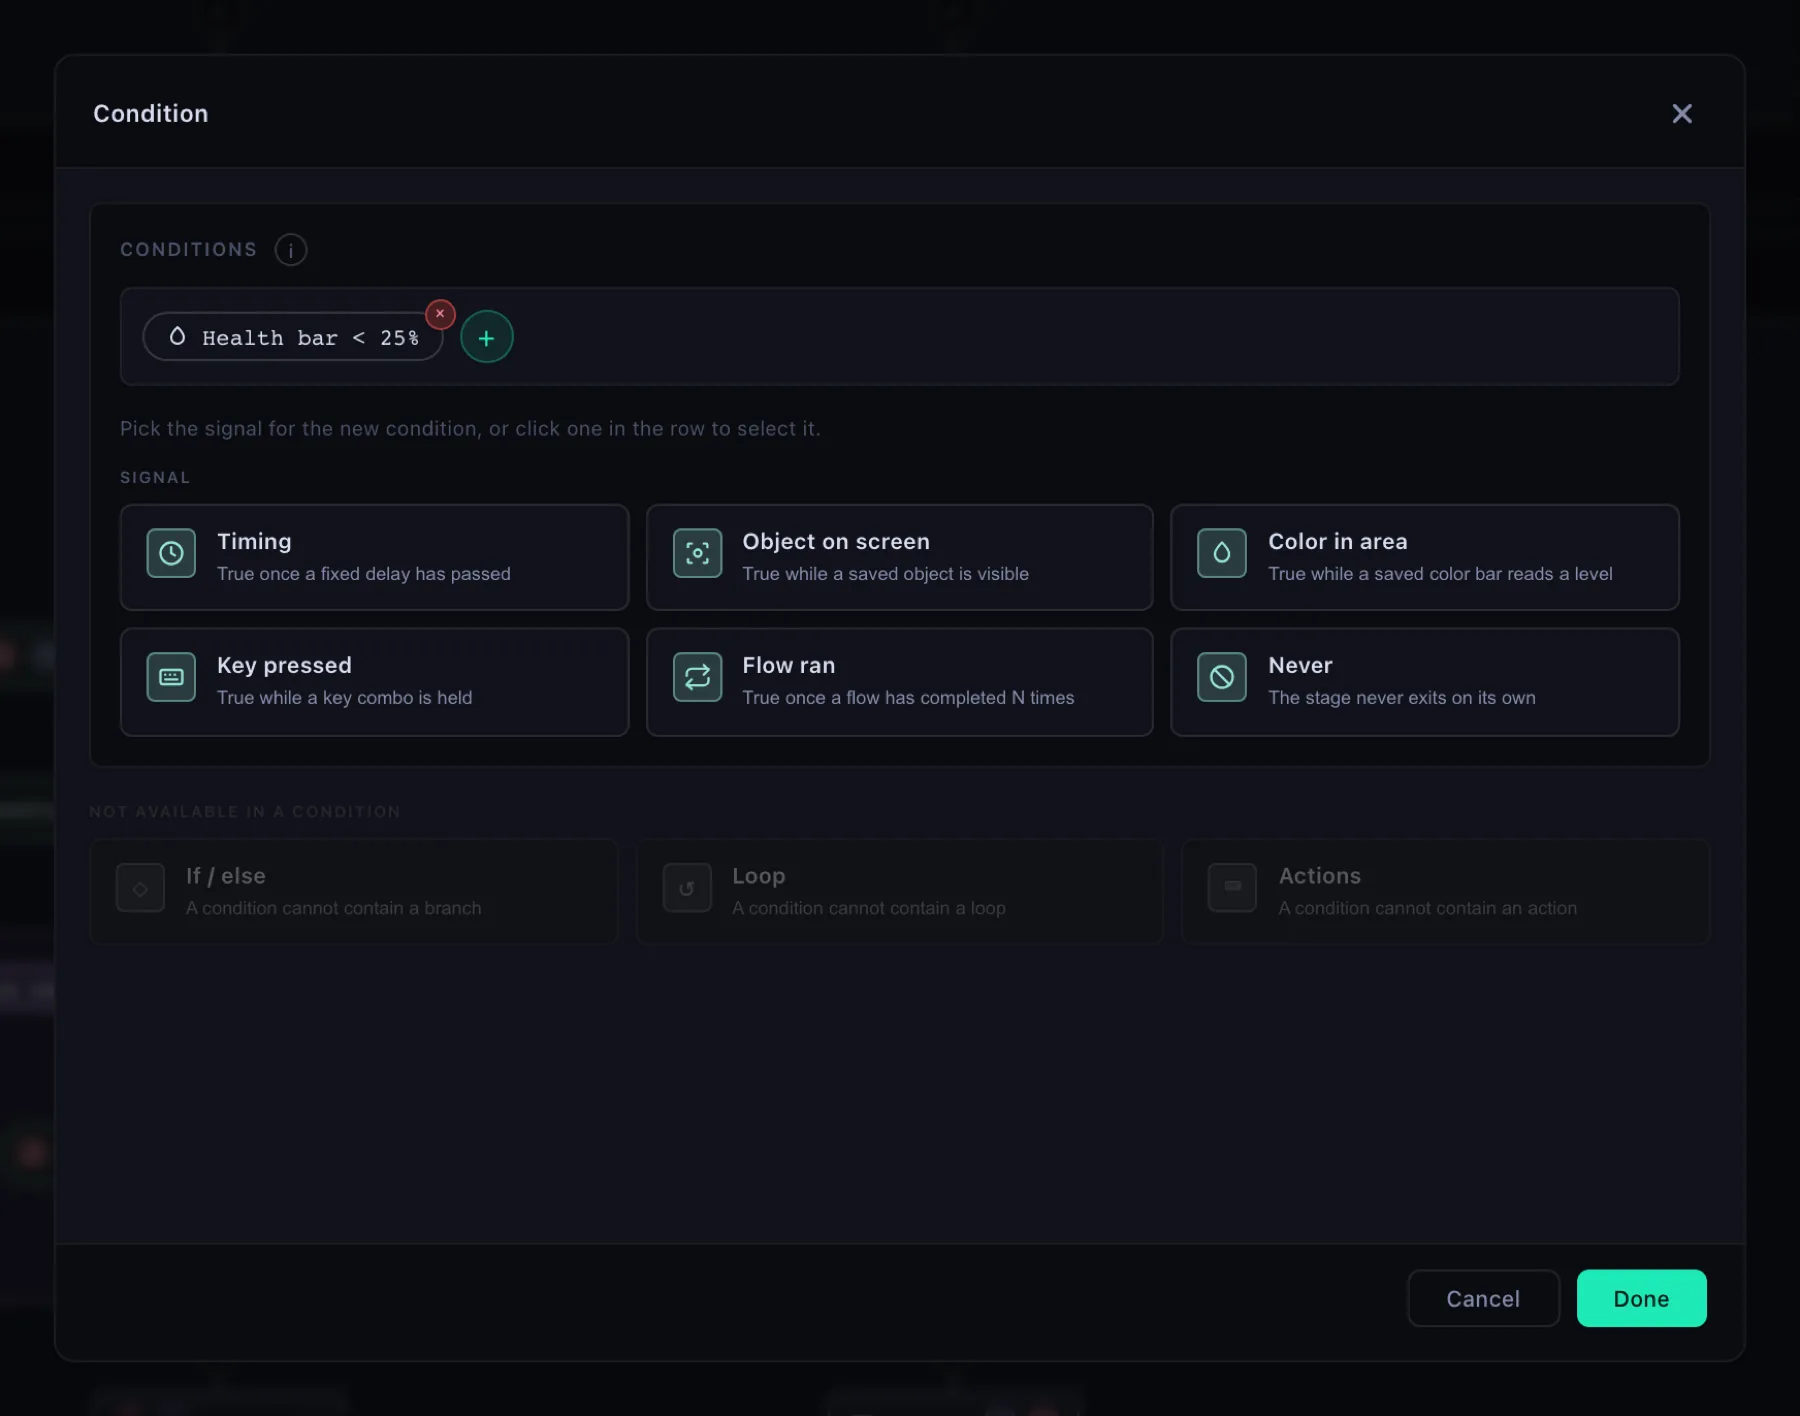
Any condition can be a tree. Click the + in the condition row, pick a second
signal, and drag one chip onto another to group them into an and / or. Dragging
a chip back out ungroups it.
One dialog, everywhere a condition is edited. This is a stage's exit condition, so every signal is on offer; a branch is not offered Timing, because a delay is something you do, not something you test, and only a stage can end on Never. The greyed row underneath says so out loud instead of quietly leaving the cards out.
04 Teaching it to see
An object is a picture of something you want found on screen — a bobber, an
icon, a button. You make one by taking a screenshot, outlining the thing inside it, and
answering two questions about how much it is allowed to change.
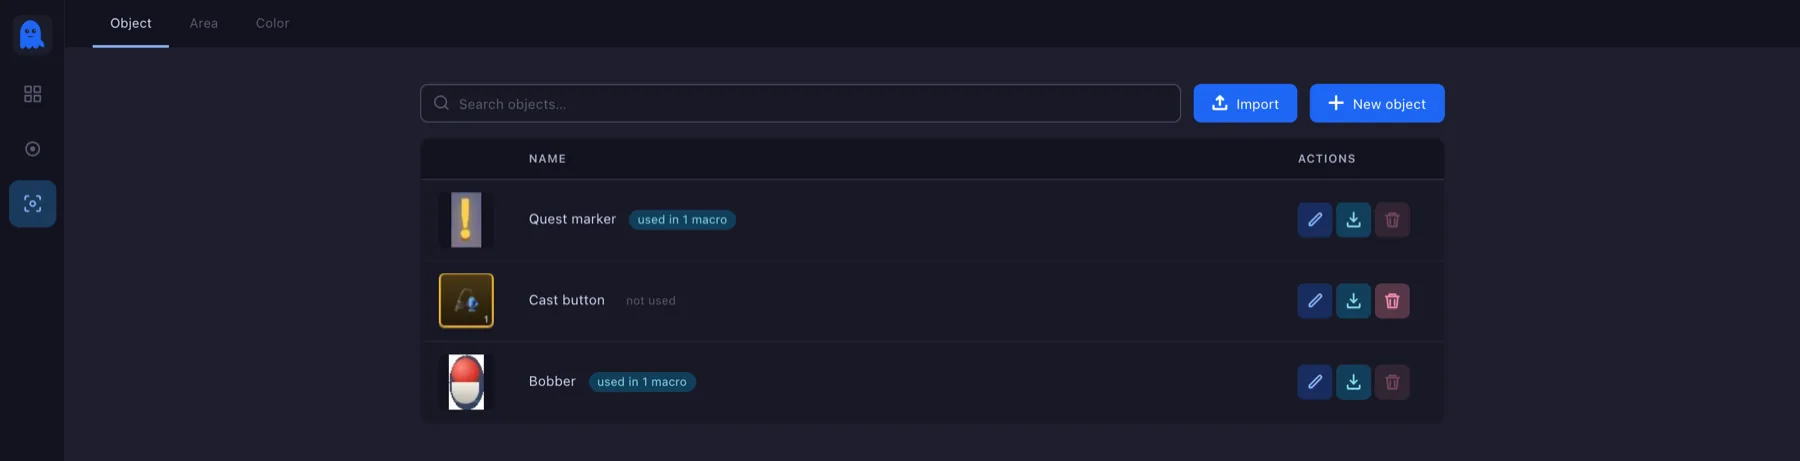
Objects live under Objects → Object. The same editor opens from inside a condition, so
you can paint a new object without leaving the macro you are building.
The object library. Each row says how many macros use it — and a row that is in use cannot be deleted, so a macro can never be left pointing at nothing. Areas and colours have their own tabs beside it.
Name it and choose how far it reaches
A global object is in the library for every macro to use. A private one
belongs to the macro (or the area) you made it from, is hidden from every other list, and
is cleaned up with its owner.
Pick the picture
Upload an image, or use a screenshot the app took. The screenshot hotkey in
Settings captures your screen without leaving whatever you are
in, and keeps the last few captures.
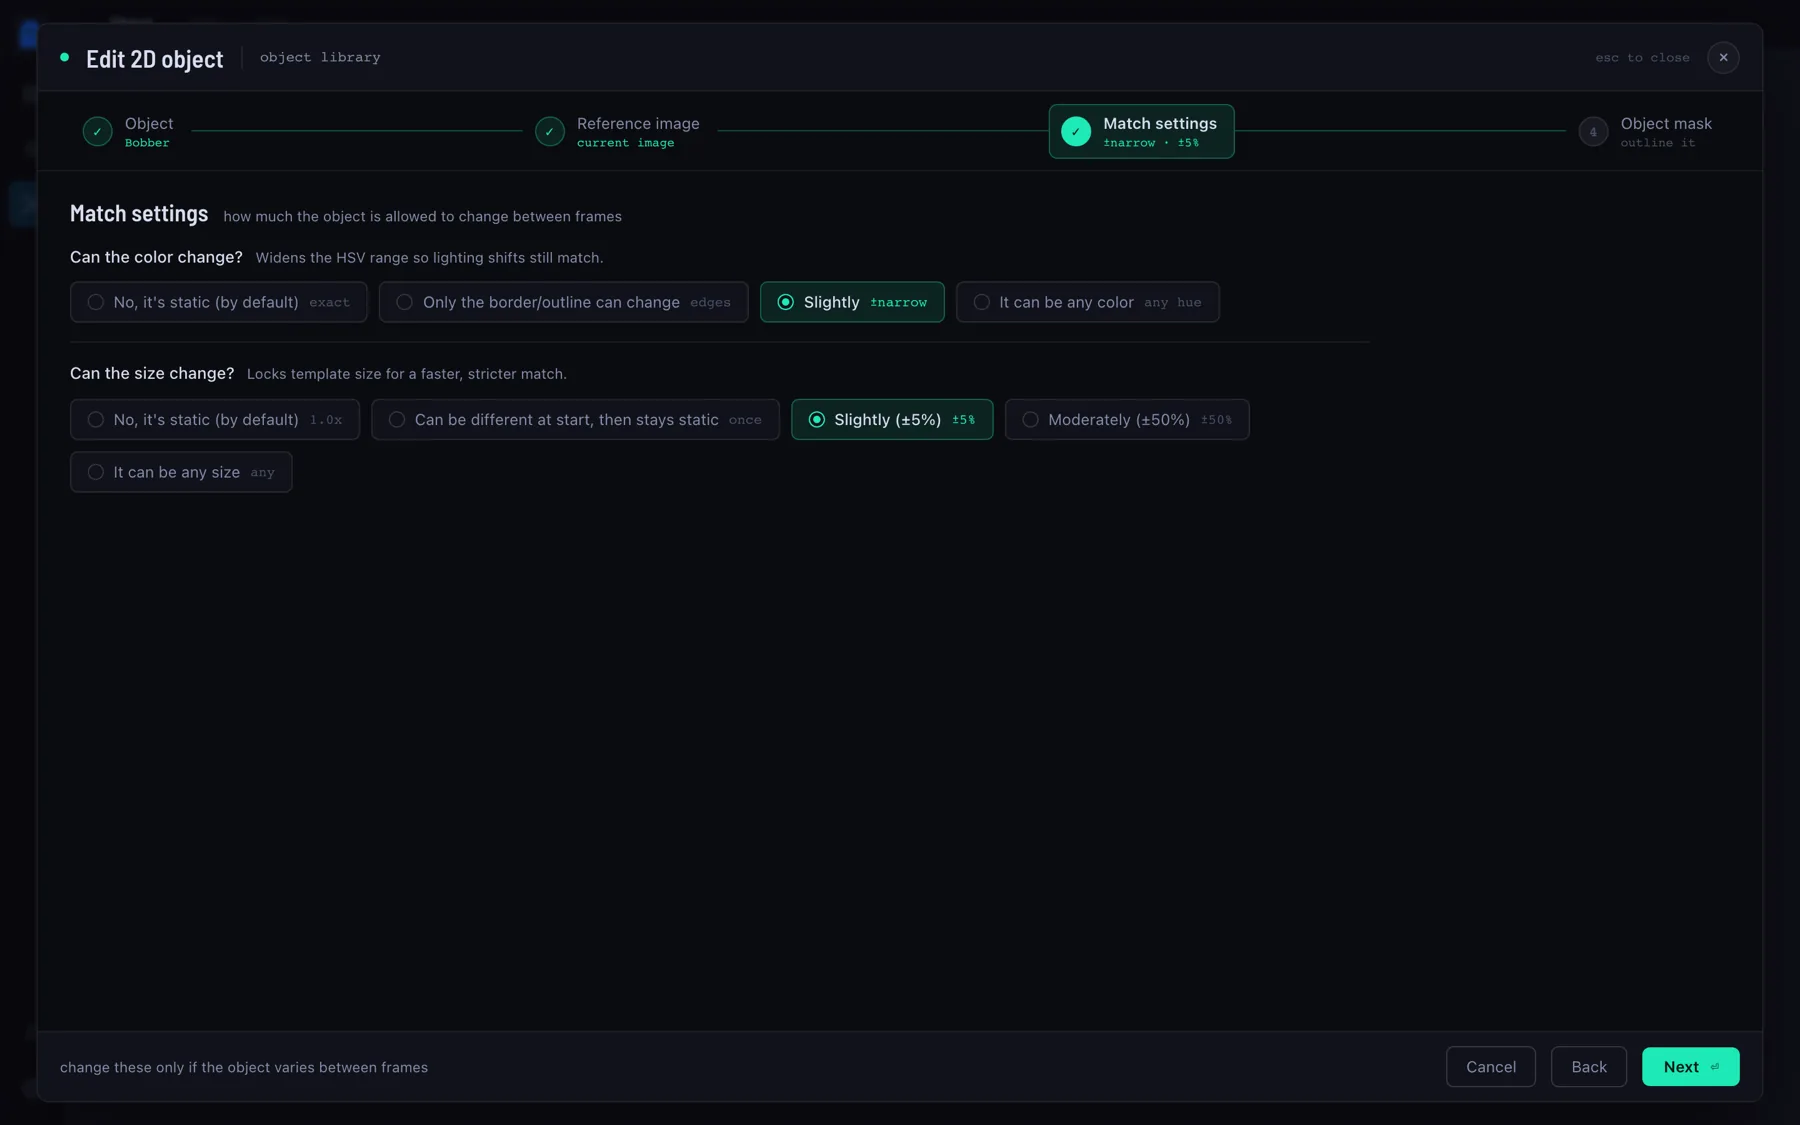
Answer the two questions
Can the colour change? and Can the size change? These are not cosmetic —
they widen or lock the detector. “No, it's static” is the strictest and the fastest;
“it can be any size” makes the search work much harder, so only reach for it when the
thing really does scale.
Two questions, one detector. Each answer tightens or loosens the match, and the shortcut on the right of each row (exact, ±5%, any hue) is what it does in practice.
Outline it
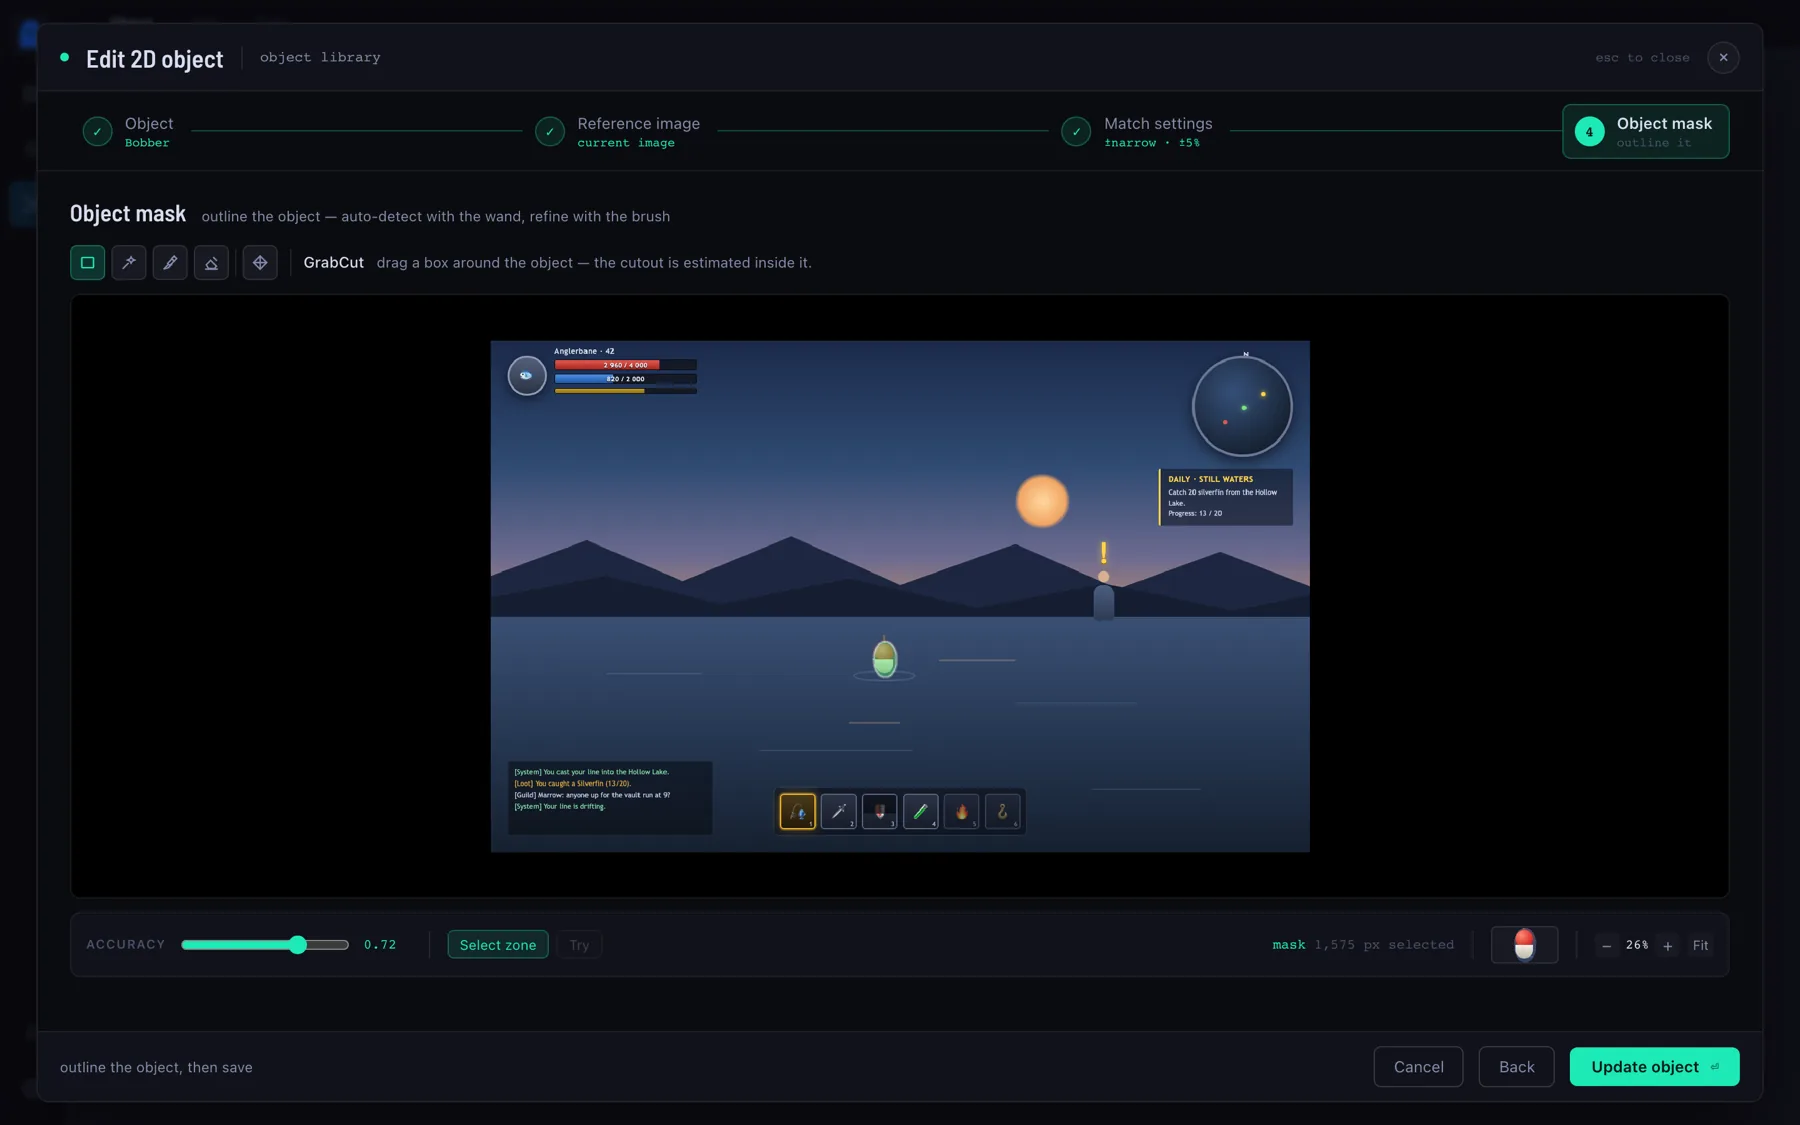
The mask is the actual shape being searched for, not the rectangle around it. Drag a box
and GrabCut estimates the cutout inside it; the magic wand grabs a contiguous
patch of colour; the pencil and eraser fix the edges by hand. The thumbnail beside the
zoom controls is the live cutout — that, and nothing around it, is what gets matched.
The mask step. Selected pixels are tinted and outlined; the counter at the bottom is how many are in the mask.
Cut tight
Include the background around an object and you have taught it to look for “the object
on that background”. The moment the scene behind it changes, the match drops. Trim
to the thing itself.
05 Telling it where to look
Searching the whole screen for a small icon is slow and invites false matches. An
area is a saved answer to “where”: a named chain of steps, each one cropping
what the step before it left.
There are two kinds of step, and you can chain as many as you like:
Zone — take a fixed rectangle of what you were handed.
Object — find an object, and take the region around where it was found.
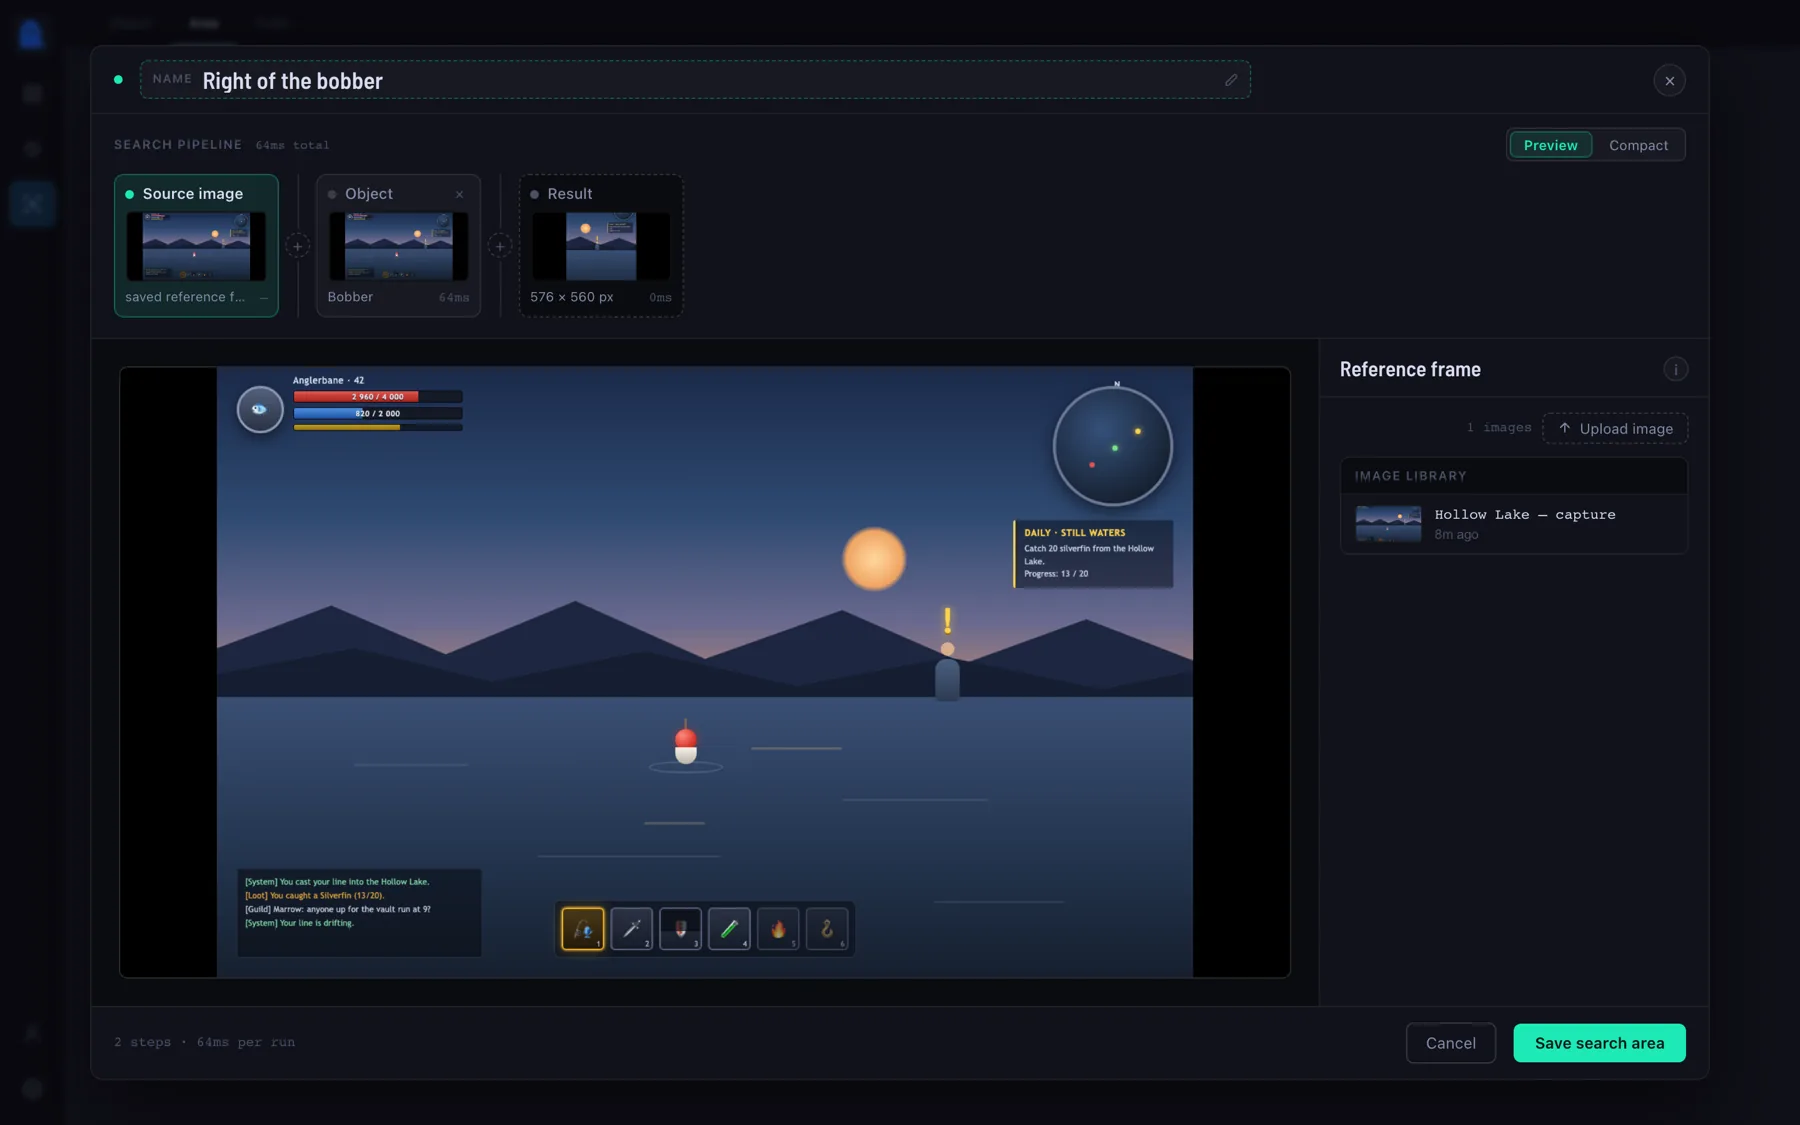
So [zone] is “this corner of the screen”, and
[object → zone] is “find the bobber, then take the strip to its right” — a
region that follows the thing instead of sitting at fixed coordinates.
An area that moves. Source frame → find “Bobber” → the region around it. Each card shows what that step produced and how long it took, so a slow chain is visible before you ever run the macro.
Zones are stored as fractions of the frame, not pixels, so an area you built at one
resolution still lands on the same part of the screen at another. The Check button in
the editor is a dry run: it looks for an object inside the area and reports whether it found
it, how long it took, and how close the match was. Running a check saves the area first
— the check runs against the stored row, not the draft, so there is nothing to run until it
exists.
Two halves, always
Wherever a condition asks for a search, it asks for both halves at once: the object (or
colour) to find, and the area to find it in. Full screen is a real answer in that
list — it means “don't narrow it”, not “unset”.
06 Reading a bar
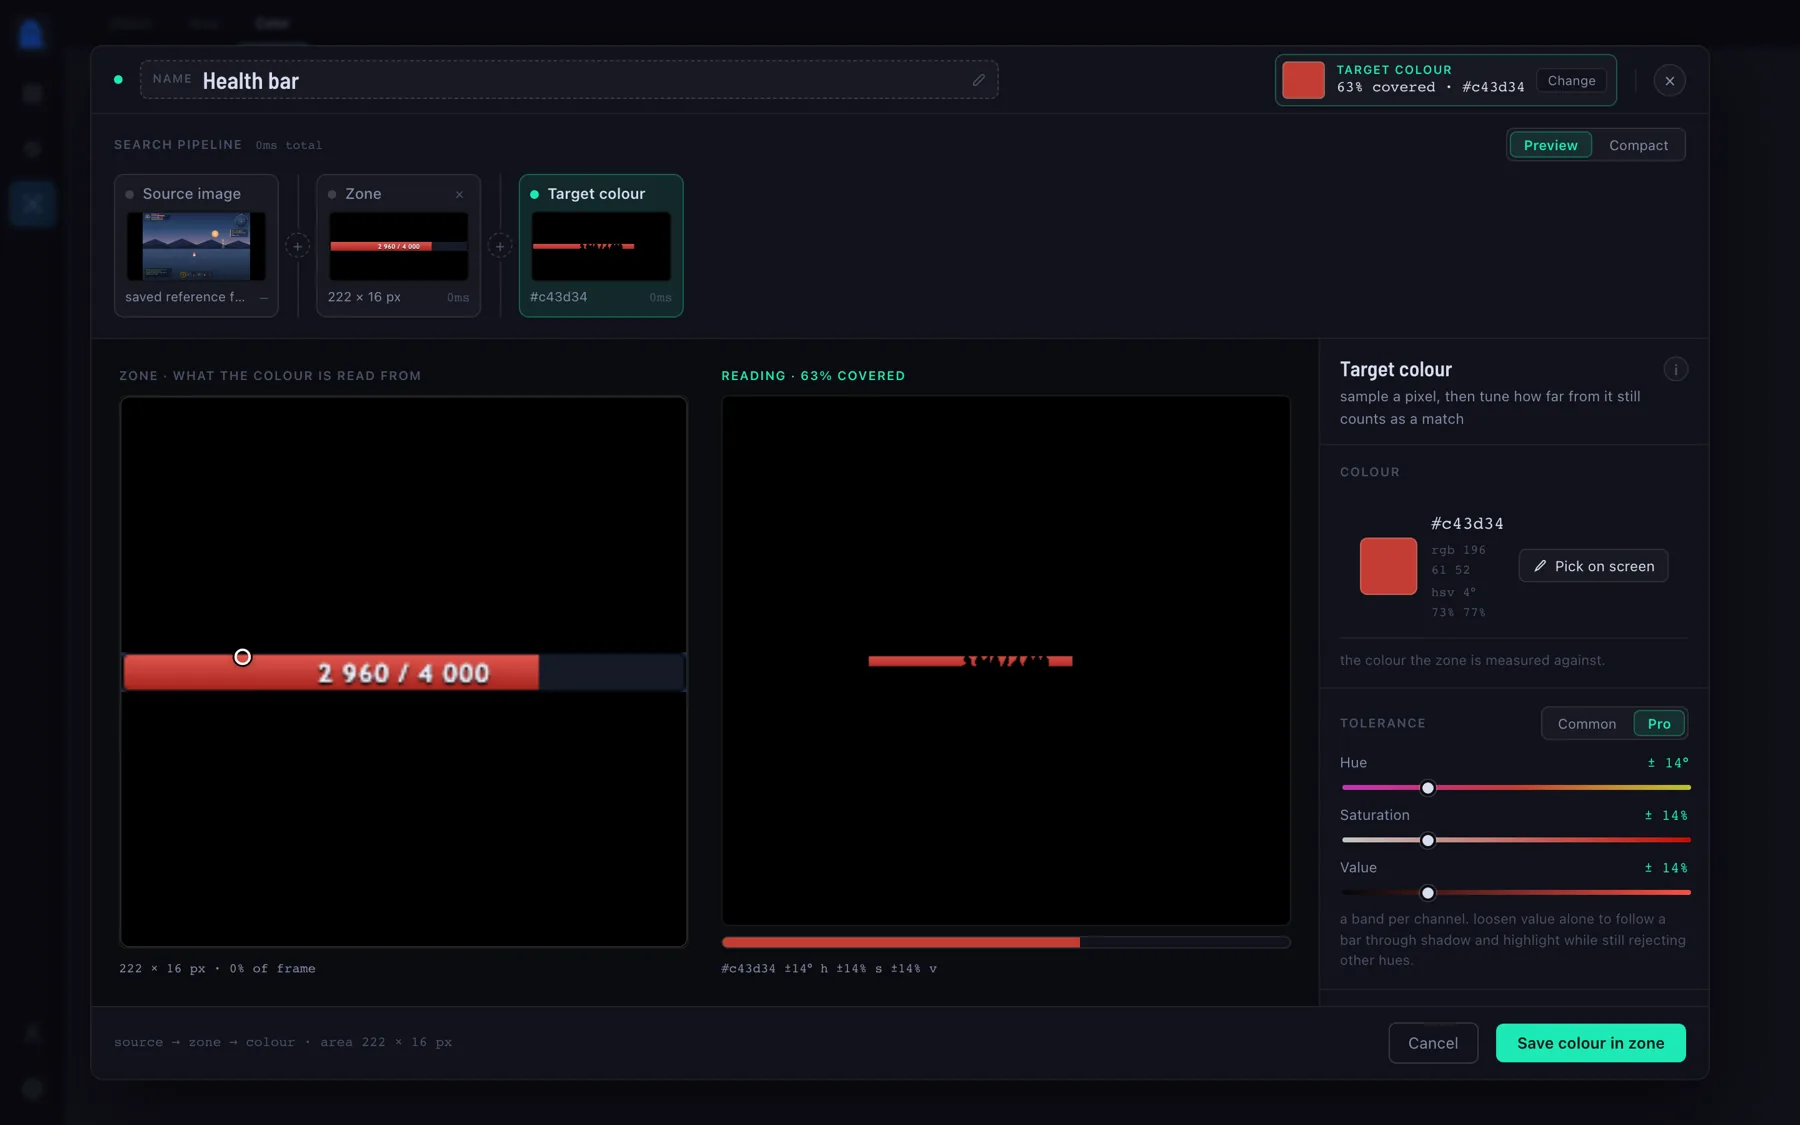
Health, mana, cast bars, progress bars, cooldowns — anything that fills up or drains is a
colour: a hex value, how far off that hex still counts, and the zone the
reading is taken in. A colour carries its own zone, because a colour without a place to
measure it means nothing.
Sampled, not typed. The eyedropper takes the colour off the frame; the preview highlights exactly which pixels matched, which is how you tell a good tolerance from one that is picking up the border too.
Tolerance — one slider in Common mode, or separate hue / saturation / value
sliders in Pro mode when a bar's brightness shifts but its hue does not.
Direction — whether the bar fills left-to-right or bottom-to-top. The same colour
can serve both, because direction lives on the reading, not on the colour.
Calibration — bars rarely fill their own box edge to edge; borders and rounded
ends leave a few per cent. Calibrate against a full bar once and 100% means 100%.
In a condition, a colour reads as coverage: more than or less than a
percentage. “Health below 25%” and “the cast bar is over 90% full” are the same control with
the comparison flipped.
07 Branches, loops and giving up
If / else
A branch asks its condition and takes one of two tracks. Each track is a chain of its own, so
branches nest as deep as you need.
The timeout on a branch is doing something subtler than a deadline: it decides how the
question is asked. Off, the condition is one check — read the screen right now,
take that answer, never block. On, the branch will wait up to the deadline for the condition
to become true before deciding, and you choose what a run-out means: take the no
track, count it as a yes anyway, or reset the flow.
Loop
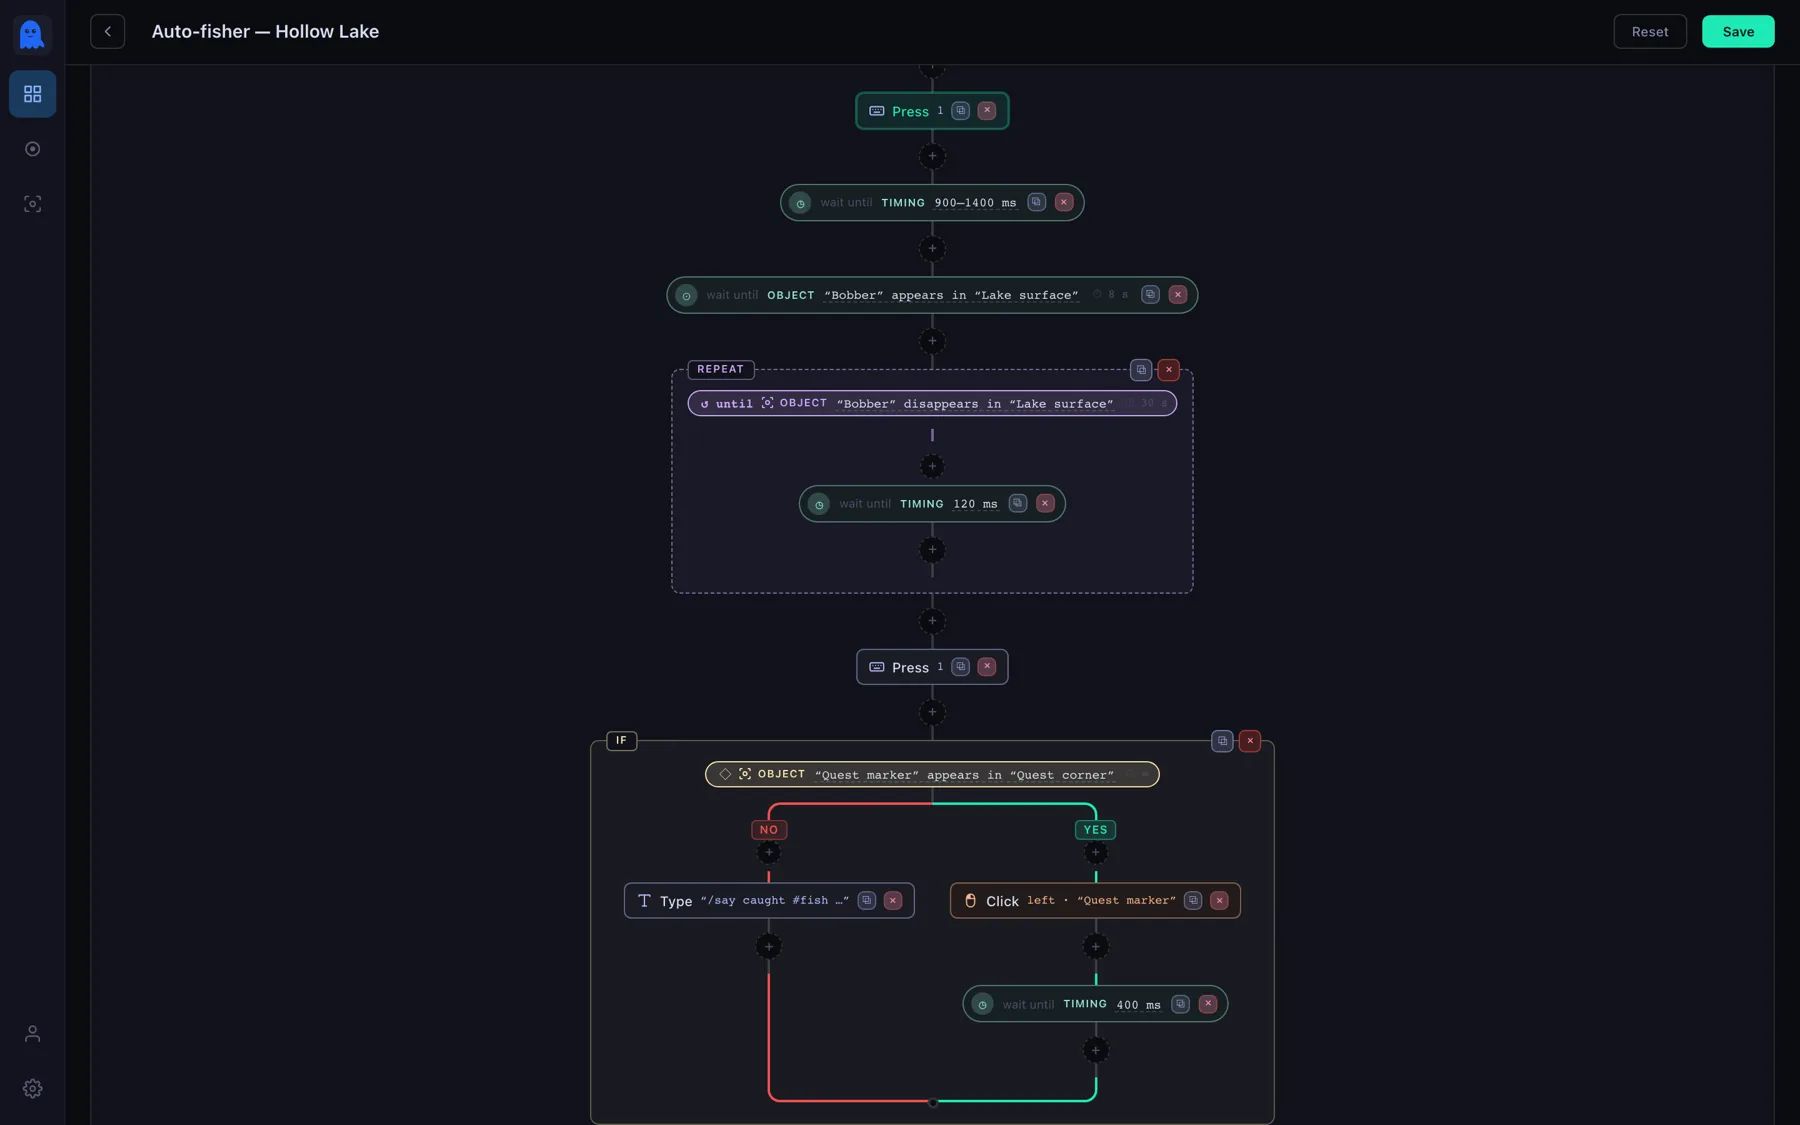
A loop repeats its body until its condition is met — “keep waiting 120 ms until the bobber
disappears”. Inside a loop, and only there, the palette also offers Break loop, which
leaves the loop immediately. Nothing after a break runs, which is why the rail draws it as a
dead end.
Nesting reads as nesting. A loop is a dashed box with its condition at the top; a branch splits into a yes and a no track. Colour follows meaning — teal is waiting, purple is looping, yellow is branching, lavender is the keyboard, peach is the mouse.
Flows are the real parallelism
You do not need a loop to “do two things at once”. Add a second flow to the stage: every flow
in a stage runs simultaneously, each with its own chain. One casts, another watches a bar,
a third types a command every minute.
08 Record it instead of building it
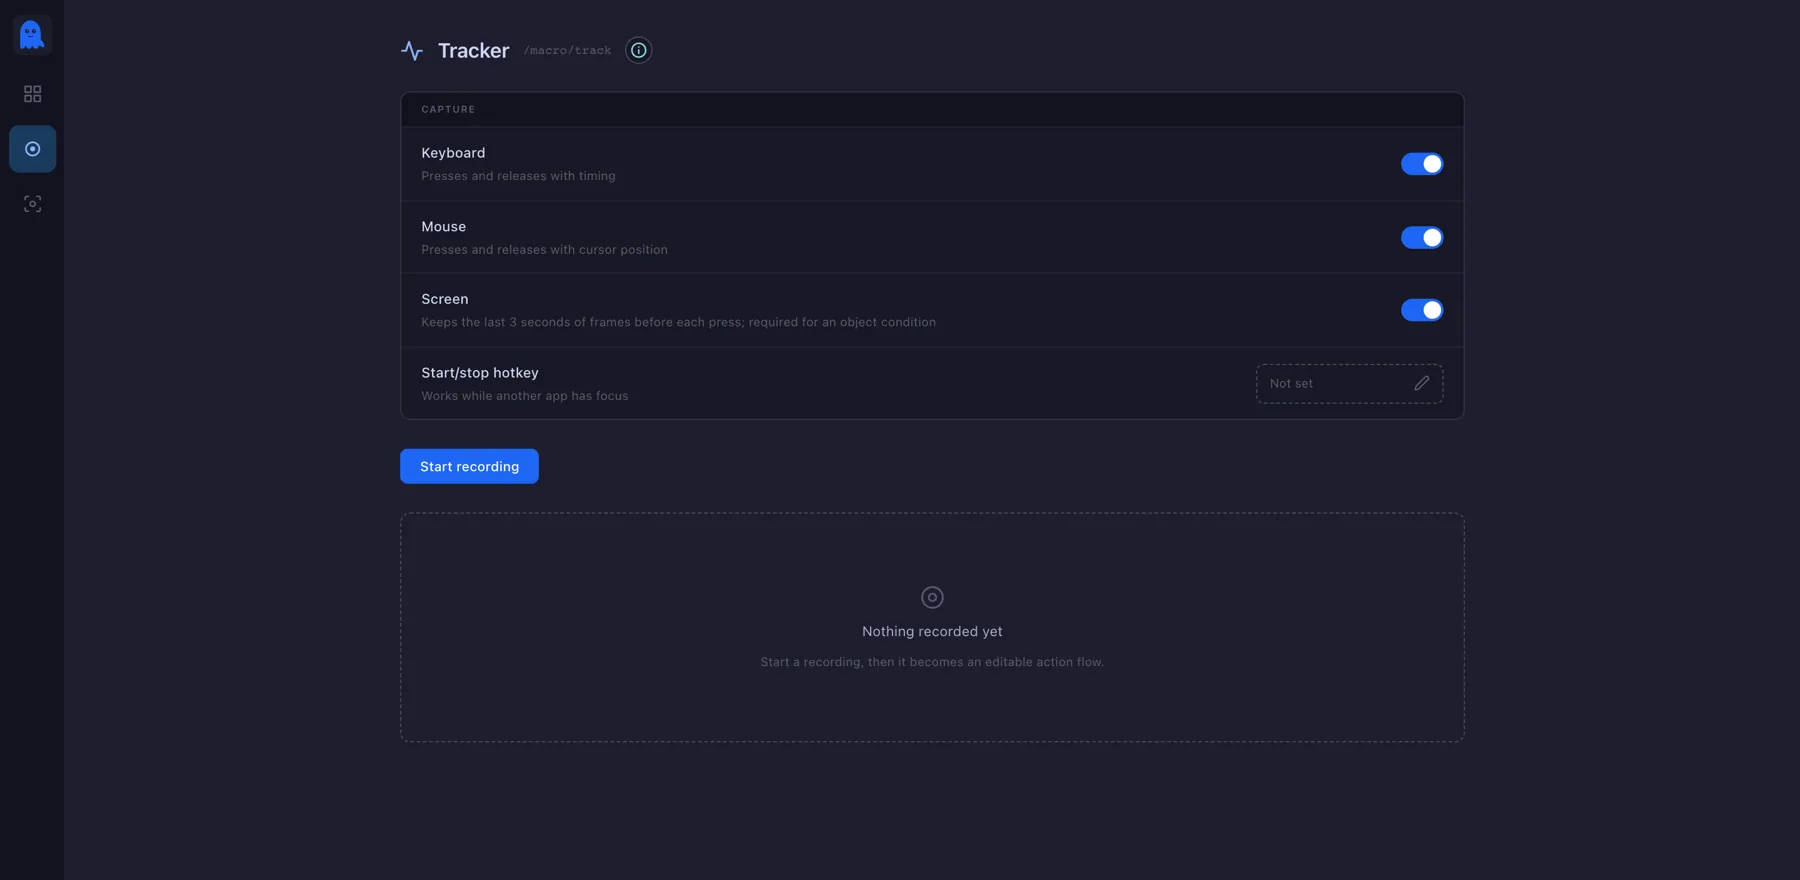
The Tracker records what you actually do — keyboard, mouse, and optionally
the last few seconds of screen before every press — and turns it into an editable flow. It is
the fastest way to get a long sequence in, and the fastest way to get a screenshot of exactly
the moment you care about.
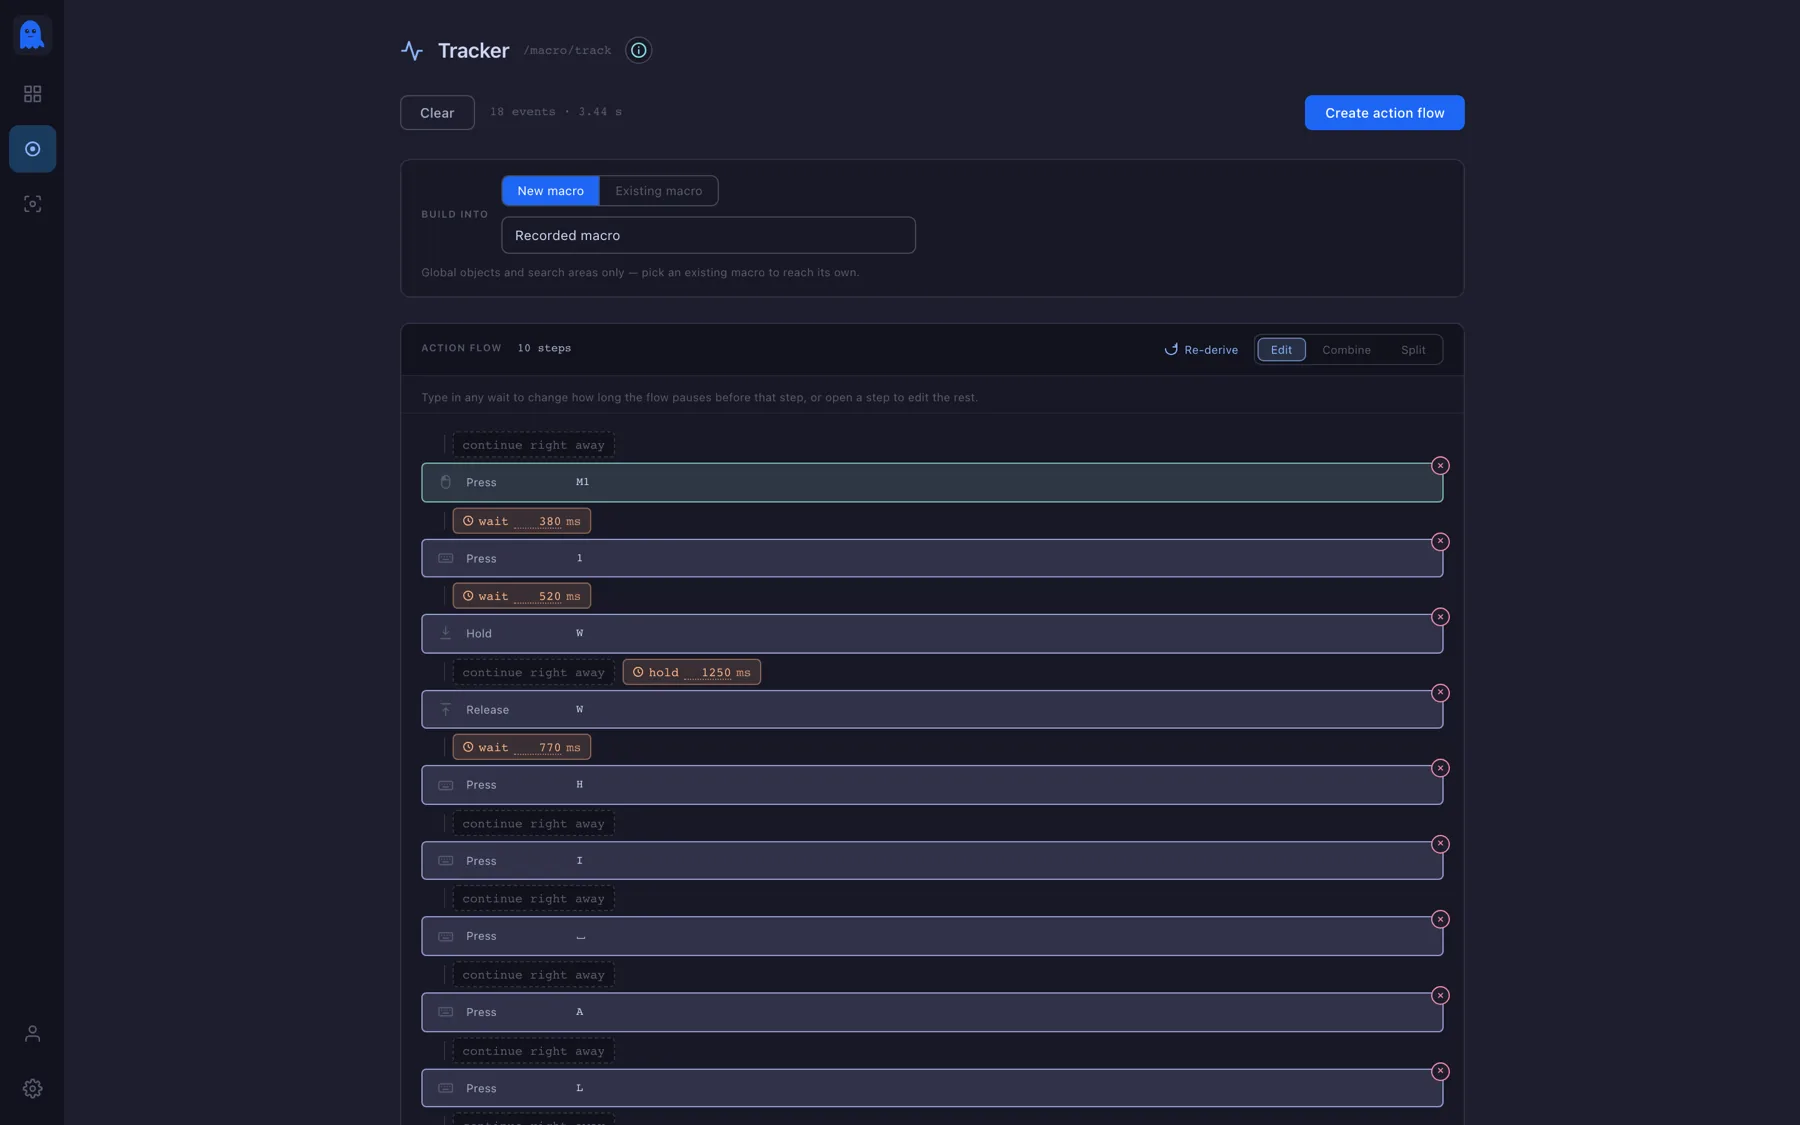
Before you start. Choose what gets recorded, then hit record and go and do the thing. The switches are read once when the run starts, so they lock while it is running.A recording, already readable. Raw presses become steps: a quick press is a click, a long one becomes hold + release with its duration, a run of typing collapses into one “type” step, and every gap becomes an editable wait on the line between steps.
Start/stop hotkey — set one and you can start and stop the recording while another
app has focus, which is the only way to record something full-screen.
Combine / Split — merge a hold with its release, or a move with the click it was
aiming, into one step. Split takes it back apart. Re-derive rebuilds everything
from the raw recording and is the page's undo.
Create action flow — writes the result into a new macro or appends it to one you
already have.
Recorded screens
With Screen on, each press keeps three frames — two seconds before, one second
before, and the moment itself. When you later open a step and go to make an object, those
three are offered first. It is much easier than trying to take a screenshot at the right
instant by hand.
09 Stages: one macro, several phases
Most macros need more than one mode. Fish until the bag is full, then walk to town; farm
until health is low, then drink. That is what stages are for: each one holds its own flows,
and each one carries the condition that moves on and the stage it moves on to.
The stage band. The chip on a stage is its exit condition; the arrow is where it goes next. A stage can also loop back to an earlier one, which is how a macro cycles indefinitely.
When a stage's exit condition becomes true, its flows stop and the next stage's flows start.
A stage whose exit condition is never is the end of the line — the macro stays there
until you stop it.
10 Counters and typed text
The Text action types a string character by character, at a speed
you set. It also understands two placeholders, which are expanded as it types:
{{counter_name}} — counts within this run. Stop and start the macro
and it is back to zero.
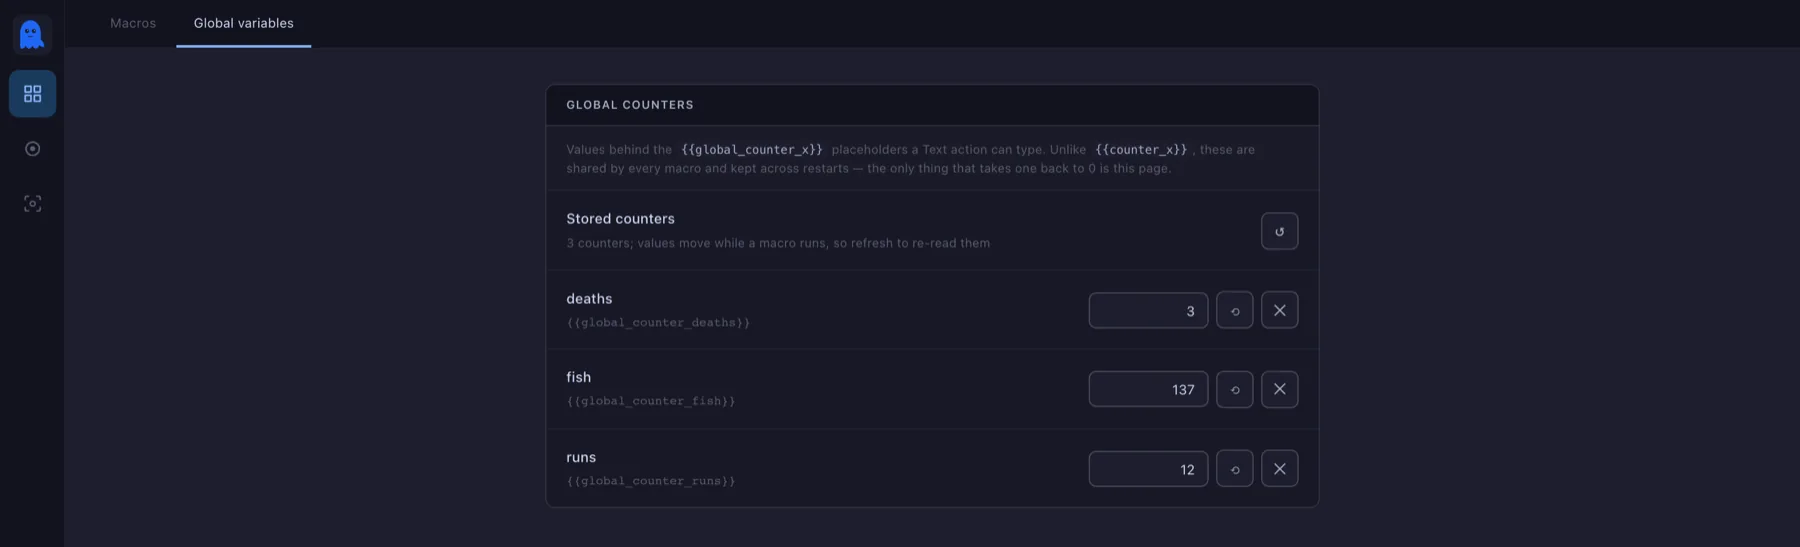
{{global_counter_name}} — kept by the app itself, shared by every macro, and
never reset unless you reset it.
Global variables. Under Macros → Global variables: edit a value, reset one to zero, or delete it. This is the only place they are managed.
One limitation
Text is typed as real key presses on a US layout, so characters that have no key there —
accents, Cyrillic, CJK — are skipped rather than mistyped. For anything outside plain ASCII,
use your game or app's own paste or emote instead.
11 Settings that matter
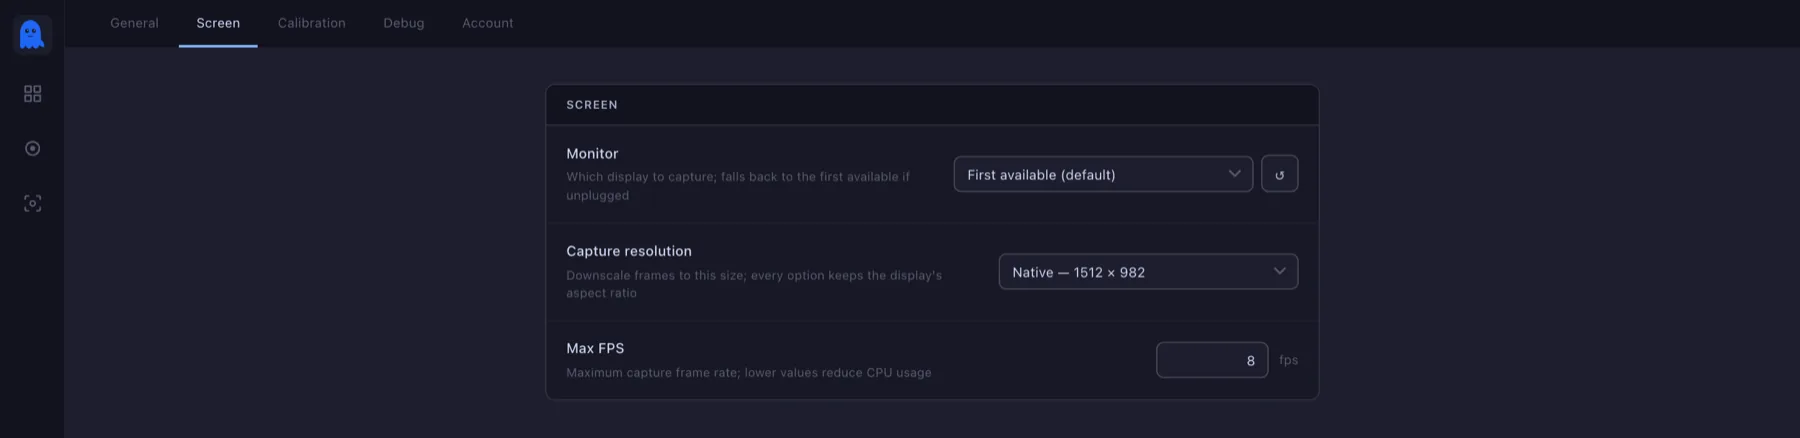
Screen. The three settings that decide how much work the app does every second.
Monitor — which display gets captured. On a multi-screen setup, point it at the
one the game is on.
Capture resolution — every option is a fraction of that monitor's own resolution,
so the aspect ratio always matches. Downscaling makes every search cheaper; go too far
and small icons stop being recognisable.
Max FPS — how often the screen may be re-read. Lower is lighter. Screen capture is
only done when something is actually asking for a frame, so a macro with no screen
conditions costs nothing here.
Screenshot hotkey — takes a capture from anywhere, and keeps the last few for the
object editor to use.
Macro start/stop sound — a short tone when a macro arms and disarms, so you know
it took without alt-tabbing.
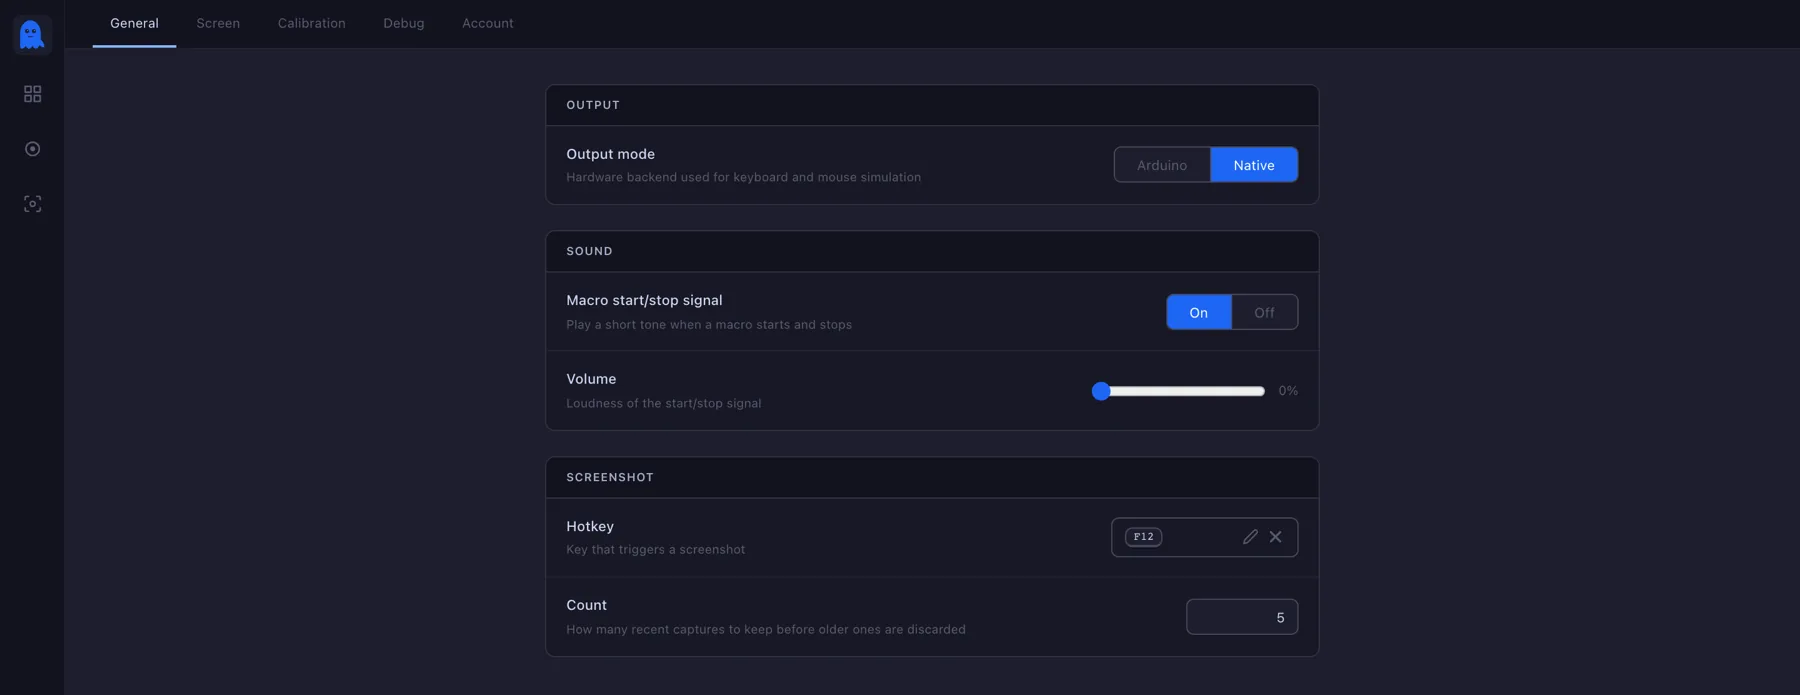
General.Output mode chooses how keys and clicks are sent — Native is the normal one; Arduino drives a physical USB device instead, for setups where a synthetic key press is not enough.
12 How do I…
The short version: the things you actually sit down to do, and the control that does each.
…make my first macro?
New macro, trigger key, and you land in the editor with one empty flow. Add an
action node set to press 1, then a
timing node of one second — that is the whole macro, since the
flow repeats it by itself. Save and press F6: it presses 1 once a second
until you press F6 again.
…start it on something other than a key?
You don't — a macro is always armed by its trigger key. Everything conditional happens
inside, on a wait node:
SignalTimingA fixed delay, or a random one inside a range so the rhythm is not identical every time.
SignalObject on screenTrue while a saved picture is visible — or, flipped, until it disappears.
SignalColor in areaTrue while a saved colour fills more, or less, of an area than the level you set.
SignalKey pressedTrue while you are holding a key combo down.
SignalFlow ranTrue once another flow in the same stage has completed, N times over.
And / orCombine themAny condition is a tree: and and or over as many of the above as you need.
A branch or a loop can only test
what is on screen or what you are holding; a delay is not a test, it is a
timing node of its own. Making it wait →
…do two things at the same time?
Add a second flow, not a second macro. Every flow in a stage runs at once, each
with its own waits. A flow has no condition of its own — a leading
wait node is what holds it back.
…change what it does completely after something happens?
That is a stage: its own flows, and one exit condition. When the condition
passes, everything in the stage stops and the next one starts with its own flows.
Only while a condition that needs a picture is being evaluated. A macro with no object
and no colour condition never captures anything. While one is live the engine re-searches
only the part of the frame that changed, so a still screen costs almost nothing.
CostMax FPS and Capture resolution are the
two dials if you want to spend less — Settings that matter →
…skip building it by hand?
Press record, do the thing once, stop. You get a flow of the real presses, clicks and
pauses, ready to trim. Record it instead of building it →
13 FAQ
Which systems does it run on?
Windows 10 and 11, 64-bit. There is no macOS or Linux build to download today.
Does it need administrator rights?
No. It installs into your own user folder, so there is no elevation prompt on install
and none on update either.
Am I allowed to use it here?
That depends on the program or the game, and only its own rules can answer it. Polter
Click is a general-purpose input tool, not a bot: it plays nothing for you, it knows
nothing about the game, it does not touch anyone's memory or files. It presses the keys
you told it to press.
Plenty of programs and online games still forbid automated input of any kind, and some
ship anti-cheat that looks for it. Read those rules first. Where automation is not
allowed, don't use it — that decision, and whatever follows from it, is yours alone.
What we are building is a way to make the repetitive parts comfortable, not an edge
over anybody.
Does anything leave my computer?
Your macros, objects, areas, colours and screenshots live in a local database file in
your Windows user profile. Screen captures are read in memory to answer a condition and
are not uploaded. The app does reach the internet for one thing on its own: checking
whether a newer version has been published.
Can I keep using the computer while a macro runs?
You can, but you will be fighting it. The presses and clicks it sends are real input,
delivered to whatever window has focus — so if you alt-tab to a browser, that is where
they land. Stop the macro before you do something else, or run it on a machine you are
not using.
I closed the window — is it still running?
Yes, and that is deliberate. Closing the window hides Polter Click to the system tray
and leaves the engine running, because a macro has to stay armed while you are in a
game or another program. Quit from the tray icon when you actually want it gone.
How do I stop a macro that is running?
Press its trigger key again, or hit Stop on its row in the list. Because the
trigger is a global hotkey, it works while another program has focus — which is the
point of setting one.
My object is never found. What is wrong?
Usually one of four things, in this order:
1. The mask includes background, so the search is looking for the object plus a
scene that has changed. 2. The accuracy slider is too strict for something that
scales or is drawn over a moving background. 3. The two survey answers are
stricter than reality — if the icon does resize, say so. 4. The area is not
actually over the object; open the area editor and run its Check to see what it
finds.
Do I have to rebuild everything when I change resolution?
Areas and mouse coordinates are stored as fractions of the screen, so they follow a
resolution change. Objects are the exception: an object is a picture at a particular
pixel size, so a large enough change in scale means the template no longer matches, and
you will want to recapture it — or tell it, in the survey, that its size can change.
How much CPU does it use?
It depends almost entirely on how much screen-watching you ask for. A macro with no
screen conditions captures nothing at all. When something is watching, the engine only
re-searches the parts of the frame that actually changed since the last look, so a
still screen is nearly free. Max FPS and Capture resolution are the two
dials if you want to spend less.
Can I share a macro with someone else?
Yes. Export a macro and you get a single file that carries the objects, areas and
colours it uses along with it. On import, the app shows you what is in the bundle first
and lets you rename it, or point each piece at something you already have instead of
creating a duplicate. Objects, areas and colours export on their own the same way.
Where is my data, and how do I back it up?
In a single database file inside your Windows user profile, under the app's own folder
in %APPDATA%. Quit from the tray first — the engine holds the file open
while it runs — then copy it somewhere safe.
How do updates work?
The app checks for a new version by itself, downloads it in the background, and asks
once whether to restart. Saying yes installs it silently and reopens the app — no
wizard, no reinstall, and your database is untouched.
Windows says the publisher is unrecognised.
That is SmartScreen reacting to how new the installer is rather than to anything in it.
Choose More info → Run anyway. If you would rather not, wait — the warning fades
as more people install the same build.
Can one macro do two things at the same time?
Yes — that is what flows are. Add a second flow to a stage and both chains run
simultaneously, independently, each with its own waits. They are not threads you have
to manage; they are just lanes.
Ready to try it?
For Windows 10 and 11. Your first macro takes about a minute.